
If you’d like to send extra-special holiday cards this year, try these layouts that don’t require any glue!
Tips:
1
For these cards, I’m using cardstock as my base, and Grafix Funky Film for my embellishments. Funky film is a shimmery, self-adhesive film that comes in a variety of sparkly patterns.
How to:
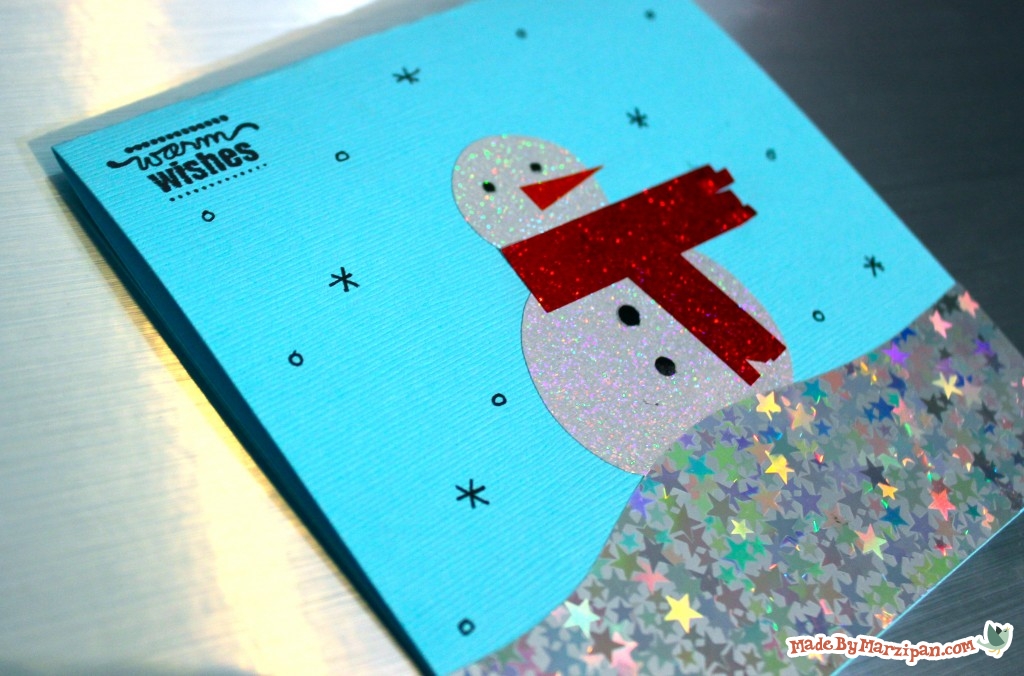
Traditional Card:
1
I’m starting with a traditional card. Cut a piece of cardstock to 5×10 inches, then fold it in half to create a 5×5 square.
2
Cut a snowman shape out of the silver glitter film. My snowman is pear-shaped. Peel off the paper backing and adhere the snowman to the center of the card.
3
The silver star film is perfect for snow drifts. Cut a wavy strip and adhere to the bottom of the card, trimming as needed.
4
Cut two rectangles from the red glitter film, and cut slits into one short end to create fringe. Adhere to the snowman to make a scarf. Separate the fringe with your fingernail.
5
Give your snowman buttons with a marker. Permanent markers work best on Funky Film.
6
Stamp a write sentiment in the upper corner.
7
Draw eyes on your snowman, and give him a carrot nose with orange glitter film. Draw snowflakes with the pen.
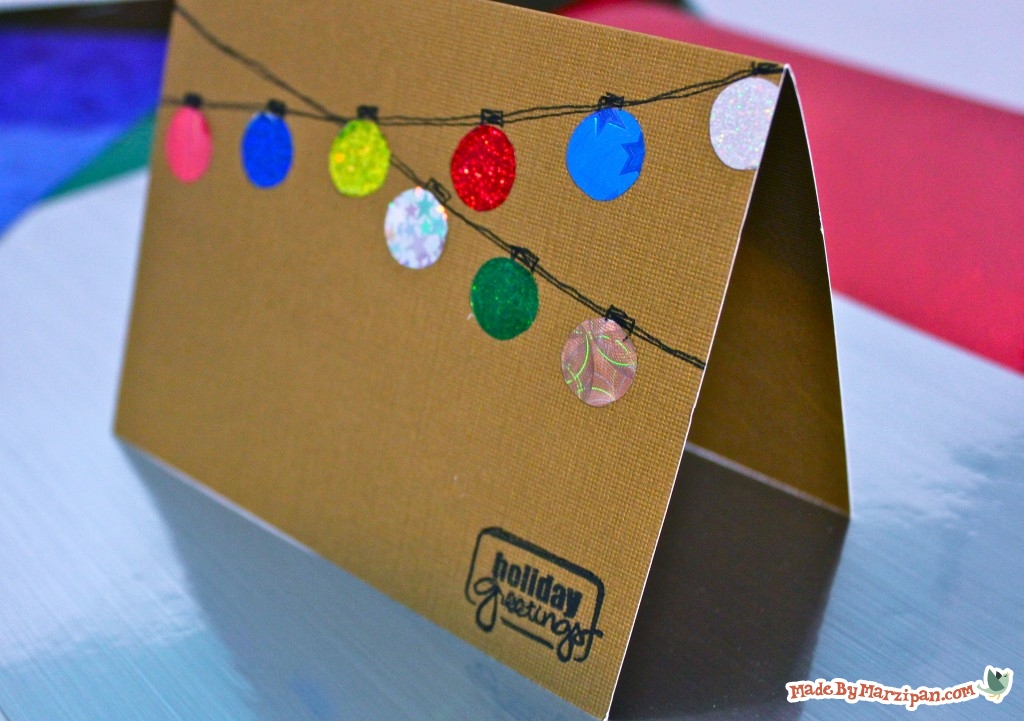
Trendy Card
Next we’ll make a trendy design. Neutral tan or craft paper is popular right now. Buntings and banners are also big. So we’ll make a bunting design with strands of ornaments.
1
Cut a piece of tan cardstock to 5.5 x 8.5 inches and fold in half. This will be a horizontal card.
2
Begin by drawing a line from one side of the card to the other, curving downward as you go. Draw a second line upward that crosses the first. Stay within the top 1/3 of your card.
3
Use a 1/2 inch circle punch to cut circles from the Funky Film. (You could also trace a dime and then cut out the circles.)
4
Remove the backing from the film and adhere the circles right below the lines you drew. Try to space them evenly.
5
Turn the circles into ornaments by drawing a black rectangle on the top of each circle.
6
Complete the card by stamping or writing a sentiment in the bottom right corner.
Modern Card:
This final card is ultra-modern, with clean lines and graphic appeal. Out of all the fun patterns available, the metallic Funky Film is my favorite. The copper, silver, and gold truly look like brushed metal.
1
This design will be made up of triangles. I find it’s easiest to first cut a square, then to cut the square in half diagonally from corner to corner. The first pair of triangles should be about an inch tall, the second pair will be an inch and a half, and the third will be two inches.
3
I’ve chosen to stagger my triangles so the right side is slightly lower than the left. Leave a 1/4 inch gap between the triangles to mimic a tree trunk.
Click here to find more handmade card inspiration!
Made By Marzipan may have received product or payment for this post. Posts may contain affiliate links. Disclosed in accordance with the Federal Trade Commission's 16 CFR, Part 255.

 Finished?
Show it off!

I have been sewing for so many years I’ve lost count, but I still enjoy a simple
easy to follow video tutorial for new projects. Keeps me from having to read the instructions! LOL I just made the anywhere chair for my great nephew and I love it; I think his mother will too. Thank you for the fun easy to watch and listen to, video. I will recomend your site to others. Maybe I’ll look for another project for tonight.
Yours Truly,
Cathy
Mississippi Gulf Coast