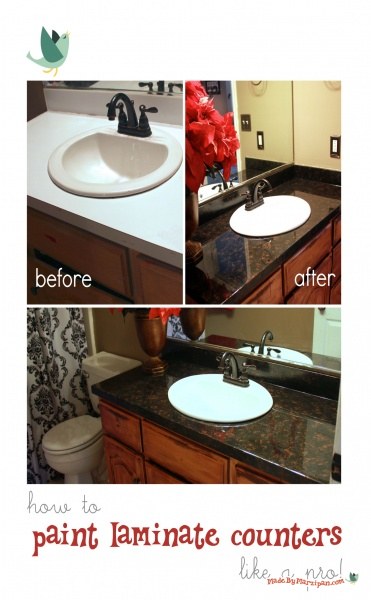
Update your old laminate countertops for a fraction of the cost, using paint and epoxy.
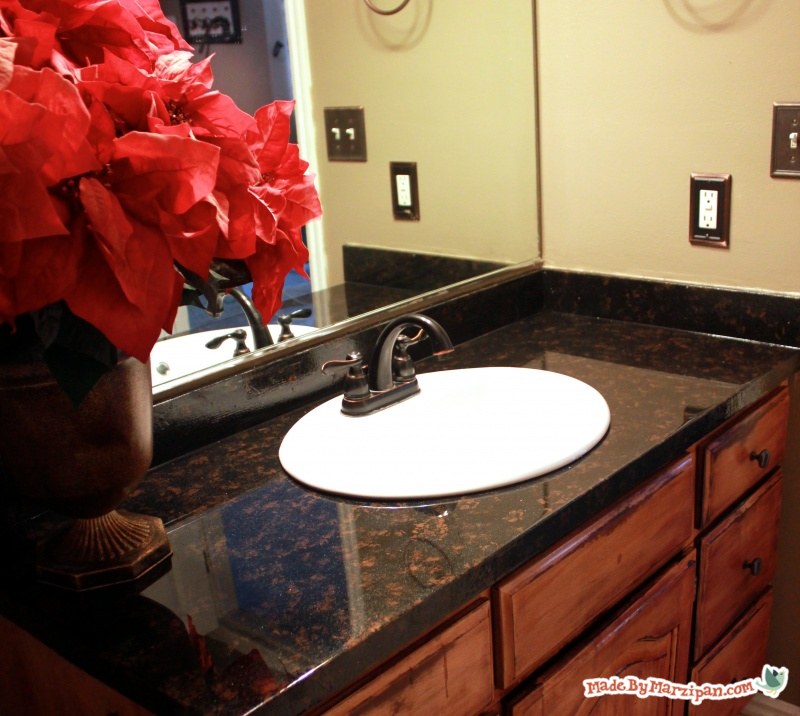
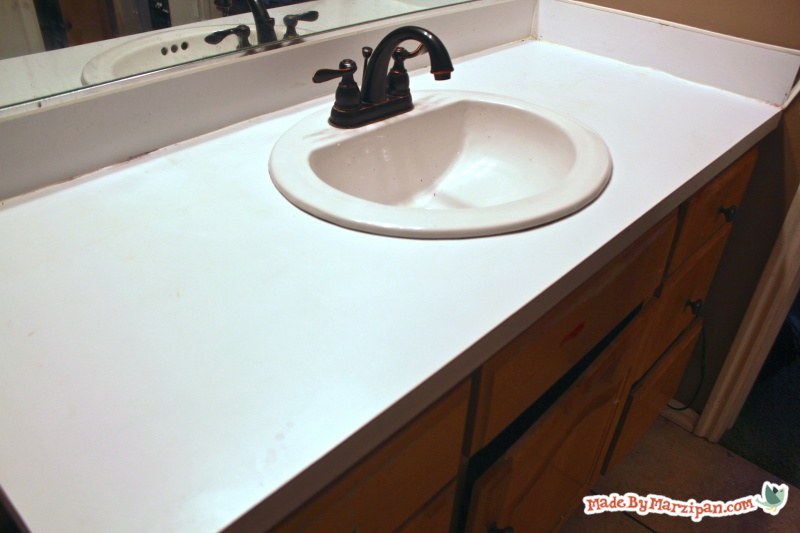
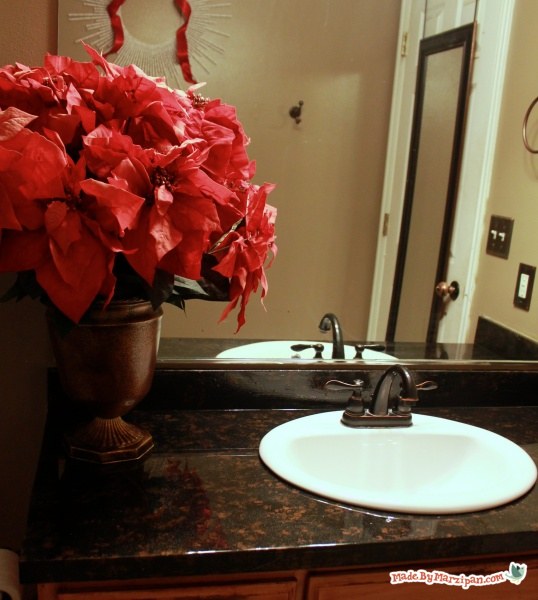
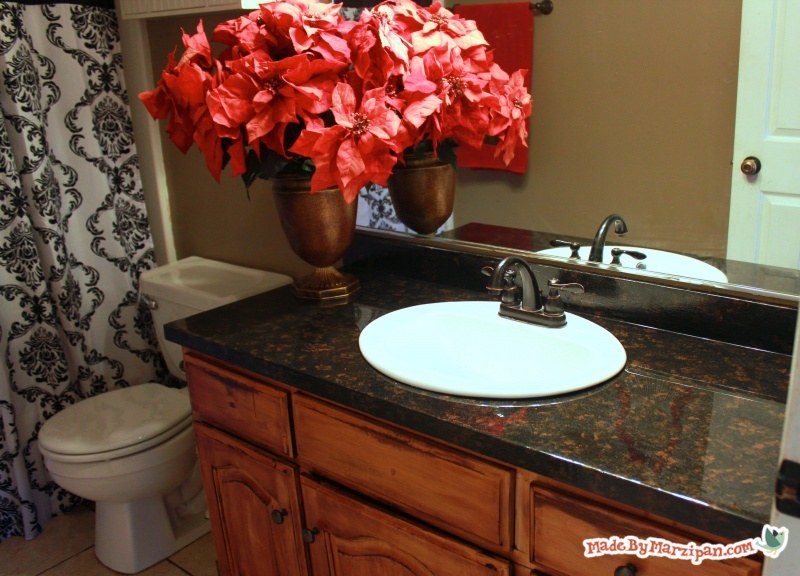
My bathroom counter top was in bad shape. Pricey granite was out of the budget, and the odd dimensions required a custom order for laminate. So after doing some research, I decided to paint and refinish my current counter top. I’ll show you how to achieve a super polished and durable finish on your laminate counters.
Expenses
- 1×4 ft. wood (backsplash): $4.99
- Pitcher: $1.00
- Zinsser quart tinted primer: $5.47
- Glitter: $1.00
- Copper leafing: $5.99
- Painter’s tape: $2.29
- Newspaper: $0.00
- Natural sea sponge: $3.98
- Foam brushes: .50 x 2 = $1.00
- Martha Stewart Lampblack Textured Metallic Paint: $6.98
- Martha Stewart Cast Bronze Metallic Paint: $5.48
- Envirotex Lite resin epoxy (32 oz.): $32 + 50% off Michael’s coupon = $16.00
If the backsplash is loose, you can pull it off with your hands. A thin putty knife will help to loosen it from the wall without damaging the drywall. Alternately, you can leave the current backsplash.
Use a foam brush to apply the primer to the counter and back splash. Don’t forget the sides of the counter as well. Allow to dry for one hour, or the amount of time indicated on the label. Then add a second coat and allow to dry.
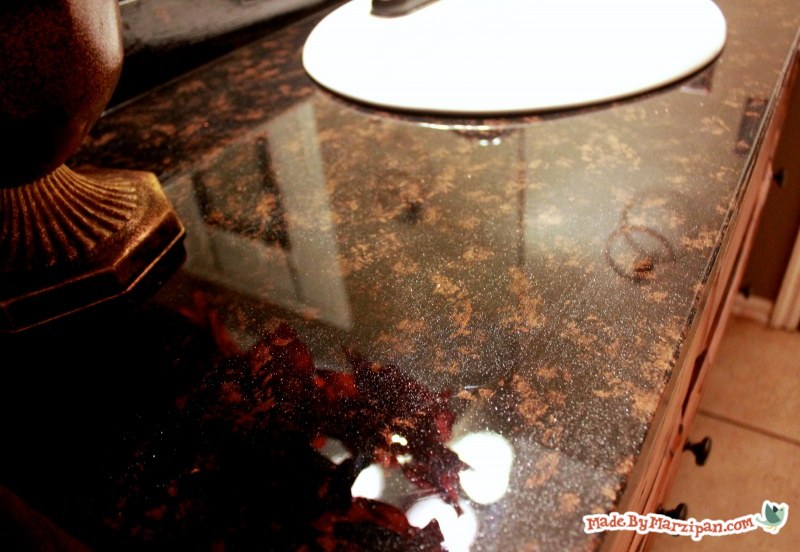
Use tweezers to tear off very tiny pieces, the size of a grain of rice or smaller. Place it in the wet paint. Go easy on this, I probably only used a dozen pieces for the entire counter top. But it has a big impact and makes the counter look more like natural stone.
So I started over, and was happier with the second finish. To achieve this look, use a small piece of natural sea sponge to add Martha Stewart Cast Bronze Metallic paint to the counter top. Rotate the sponge so the paint doesn’t look uniform.
- I’m using a 32 oz kit for my counter. It is extremely important that when you mix the two parts together, you add exactly equal amounts of each liquid. Since I’m using the entire kit, I can just pour in both bottles. If you’re using less, you will need to measure precisely.
- You’ll need to mix the liquids in a disposable container with a flat bottom and sides. It needs to be at least 50% larger than the volume of liquid you’re mixing. A plastic pitcher from the dollar store is perfect for this.
- Stir vigorously with a wooden paint stick. Scrape the sides and bottom continuously. You will need to whip the mixture for at least two minutes. Tilting the pitcher as you stir will help to distribute the liquid for more thorough mixing.
- Don’t skimp on the stirring, your project will not set properly if you do. As you stir, you should see bubbles forming in the mixture. Some may even float up. Bubbles are desirable and they mean you’re doing a good job.
- The warmer the room is, the more quickly the epoxy will set. The room needs to be at least 70 degrees for proper curing. Keep the humidity low for best results.
The epoxy is not flammable, however, your newspaper is! So use caution. Hold the flame close to the surface, but not touching it. Wave the lighter back and forth to pop the bubbles. Do not hold the flame in one place, keep it moving.
After about 30 minutes, the epoxy will have thickened enough so that new bubbles won’t form. Drips will be less frequent, but check on it every half hour or so. Hardened epoxy has a super glossy finish. Note: matte finish can also be achieved, read Envirotex Lite instructions.
FAQ:
Envirotex Lite has been used as a finish on bar tops for a long time. I contacted the company and asked whether the cured counter top would be safe in a kitchen. The representative told me that it is safe for food prep.
According to the manufacturer’s website, this product dries to a hard yet somewhat flexible finish, so the surface isn’t brittle. Place hot items such as pans and curling irons on a trivet rather than directly on the counter. Use a cutting board when chopping food. Beyond those precautions, this counter is very durable! It stays glossy and smooth.
The epoxy does have an odor when it is in its liquid form, but has no smell once it has cured.
Use a standard kitchen spray. Avoid cleaners with alcohol. For super shine, wipe with a furniture polish.
No, not once it has cured. However, you can paint over the cured epoxy and pour a new coat, if you would like a different finish.
No, not if it has been mixed. It will harden.
I didn’t find it at any hardware stores, but several of my local craft stores carry it. I bought mine at Michael’s using a 50% off coupon (download their free app to access weekly coupons).
I’ve seen similar tutorials where people didn’t. But in my opinion it’s an important step. If the sink is sealed to the epoxy and you have to remove or replace your sink in the future, you will have problems! It’s worth it to do it right the first time, or you may have to re-do all that work later.
If your sink is leaking, there are a couple of things you can try. You can purchase plumber’s tape for about $1 per roll. It’s a thin white tape that you wrap around the threaded portion of a pipe.Wrap tightly, then try again to attach the pieces. It helps to create a tighter seal.
Another thing you can try is plumber’s putty, which is about $3 a tub. This is a soft, clay-like material that remains pliable; it doesn’t harden. Roll it into a snake-like strand (don’t do this on a marble counter) and press around the area that’s leaking.
Hardware stores and craft stores carry them, as well as large discount stores. Expect to pay about $7 at a hardware store (in the section with paint tools), about $5 at craft stores (by the paintbrushes) and $3 at discount stores (check by the bubble bath).
No. The specialty paint is pretty thick, and the epoxy seals the gap entirely.
Check out the gorgeous makeovers at Remodelaholic and Revlon Renovations.
Any other questions? Ask away and I’ll try to answer them in the comments below.


 Finished?
Hello
Do you have any suggestions for ceramic tile, preferably for kitchen countertops?
If you want to refinish the tile, you can do the same technique I did, with some additional prep first. You would need to pour a base layer of Envirotex over the tile. The Envirotex levels itself out as it settles, which would give you a smooth surface to work with going forward. You would need to let that layer harden, then proceed from there with the primer, paint, and Envirotex as I did in the tutorial.
Your tutorial inspired me. I love your countertop and now love mine as well. Thank you for your step by step instructions. I appreciate you so much!
Just Subscribed and loved the counter top… How is it holding up so far in your bathroom? I want to try it sooooo bad on my ugly counter top. thanks for the tutorial.
It’s still gorgeous! The downside is, it does show waterspots and dust a lot more than my plain white counter did. But if I’m a good housekeeper and wipe it down once a day, it stays beautiful :)
Love your channel!!!
Thank you for the very helpful post.
Your so clever
WOW!!! It looks so professional and at such a low budget… Makes me want to rip off all the old countertops at my house and renew them
Awesome tutorial. Thank you!
I was just thinking about it! Thank you for the awesome tutorial :D
Your amazing
Very very nice! Looks very professional. Great job!
Great Tutorial! Was wondering if this is the same method for kitchen countertops. Thanks!
Yes, you can do this with kitchen counter tops. If you visit my website I have links to similar tutorials that have photos of kitchens :)
Omg! This is amazing!!! Love it! You’re the best!
Thank you so much!! I’m going to do this today!!
Awesome tutorial, thank you……
This is great thank you
1 GOOD JOB, THIS IS GREATTTTTTTTTT! Thanks! Cant wait to try:)
It looks VERY, VERY BEAUTIFUL, but kind of hard to do. You make it look super easy to do. If you don’t know what you are doing exactly, you will mess up. Because you have to use a lot of common sense tricks and VERY FAST to do all of this.
Yes Wild Child, you do need to work fast to spread the Envirotex. If you’re doing a kitchen, I would recommend having a second person to help. But you can take all the time you want to paint and sponge :)
Amazing job. I did my kitchen counters like this last year. I found the best way to make them shine like new after cleaning is stainless steel wipes because regular cleaners leave streaks (even windex)
Unbelievable how gorgeous thid turned out. A new level of diy genius
The best transformation I’ve seen so far.. Great job!
How is the paint holding up?..the finish etc..any peeling? I am afraid to do mine unless I know I will not totally ruin them..
It’s gorgeous. It’s very hard, it isn’t going to peel up. The only thing I don’t like is that they show water spots and dust more than my laminate counters did, because the finish is so shiny. But as long as I wipe down the counters once a day (like I really should anyway!) then they look beautiful. I’d do it all again in a heartbeat :)
I think this has to be the most fabulous DIY video tutorial I have ever seen. You are amazing!!!! Thank you for teaching us this trick. :D
Do you think this will work on an old marble table that has several cracks in the clear coat.also it’s light colored and I would Luke to make it the color in your video.any suggestions?
I was watching how to refinish laminate counter tops by Rust-Oleum counter tops transformations when I found yours, what a beautiful finish work. Congrats! I noticed you didn’t sand of the counter top…why? Your response is appreciated. Any idea in painting bathtubs, sinks?…something that will last eternity,
I looked at Rust-Oleum, too, but it seemed pricey and like more work. No sanding required when you use Envirotex Lite. As for bathtubs and sinks, that’s a different ball game… you would need an epoxy paint, and those are ridiculously expensive and I’ve only seen them in small vials for touch-ups. Let me know if you find any more info about redoing those, because we’d love to know!
tutorial is fantastic…I couldn’t find the link for kitchen counter tops. How is the bathroom counter holding up? one question on this one…you did not rough the counter top w/sand paper…why?.
Hi Alice! The bathroom counter still looks amazing. I do have a small spot that is bright pink, where my teen dripped her hair dye. I can’t get it off :( I imagine that would be the same even if I had laminate or granite, though. There was no need to sand the counter top. The primer makes the paint stick, while the Envirotex Lite protects the paint. Envirotex Lite will stick permanently to anything, even glossy surfaces, so there’s no need to sand :)
Does the epoxy run down the backsplash while curing and if so what do I do to smooth it out?
Yes, a bit. I just used a foam brush to smooth out drips.
Love this project. Is there a specific reason you apply the paints and primer with a foam brush? The project I wish to tackle is a kitchen counter and is much larger than the surface in your video. A paint roller would go much quicker, but would it work as well? Also, have you tried any other finishes with your counters? Do you think a solid color with a little glitter shimmer would look nice if you were afraid to sponge, or were trying to save on time?
Yes, you can use a roller for the paint and primer. As my counter was rather small, it was just cheaper for me to use a foam brush instead of a roller. I haven’t done any other counters, but if you try a white, I’d love to have you come back and post a picture at the bottom of the post so everyone can see!
Amazing!!! I have spent hours looking at websites on how to make old kitchens and bathroom surfaces look new. Your laminate bench transformation is the best by far!!! Im wanting to do my laminate splashback in my kitchen in the same style as yours. I could not remove it, too difficult, messy and my house is too old for that!! I’m just wondering if I could get the same result as you, on a large vertical service? Would I need to be extra cautious of drips, running etc after I apply the epoxy? Im hoping to get a faux stone/marble look.
Thanks.
Well, I don’t think you will be able to keep it JUST on the backsplash, but as long as you’re doing your counters too, it shouldn’t be a problem. You will definitely need more than one person, because for the first 15 minutes or so, you’ll be continually wiping upward to spread the epoxy evenly, since it will drip downward. I think it’s doable, but you’ll need an extra pair of hands :)
I am having a hard time finding the Lampblack color online and in stores. Would you recommend or try a different product?
Hi Marzi,
I wanted to thank you for your very informative video on painting countertops. I was so inspired I painted my kitchen countertops (faux granite look and I also used copper leaf) and used a similar product to Envirotex Lite called Glasscoat (I’m in Australia). The only problem is the color is much darker than I intended and I’m desperate to re-do the countertops in lighter colors.
You mentioned that you were not happy with the first colors you used and started over. (I have my fingers -and toes!! crossed) that it didn’t involve removing the Envirotex Lite coat. Did you paint over the E.L. or did you remove it and if so, HOW??
I would so appreciate your advice, kind regards Niki
Hi Niki, yes, the epoxy does intensify the color quite a bit, doesn’t it? You don’t need to remove the first layer of epoxy. I just primed right on top of it and re-painted, then re-poured the epoxy. I was very subtle with the copper accent color the second time around :) Feel free to post pics in the “Made By You” section below when you’re done!
Hi Marzi: After watching and reading your post we decided to go ahead and re-do our laminate countertops. I did more of a marble type look and I love the subtle look of them. We are getting ready to do the environtex portion and I must say I’m a bit nervous about this part. Will it settle properly and how long will we be without the kitchen sink and dishwasher. How much time do we wait before we can put the sink back in? If it all comes out okay, we will post pics!! Thanks so much for your post. It gave us the courage to go for it!!!
Hi Lisa, I think you will love how they turn out. My advice is to remember to stir VERY well and you won’t have problems with settling. My other recommendation is to stay on top of those drips, check for them often and wipe away with a foam brush. You should be able to put the sink back in within a day. Please come back and post pics when you’re done!
I love this and I love working with Resin. My questions are: How do you protect the finish from things like sprays, Hair spray, deodorant spray, etc.? How do you protect it from scratches? Thanks and I am going to follow your blog for your great ideas.
I don’t do anything special to protect it. I just clean it with Windex and everything comes off. Envirotex Lite doesn’t scratch easily.
Did my bathroom countertop and it came out great only thing is now I would like to add more color. Can I add the color over the epoxy then add more epoxy?
Yes, you can!
Hi there! I read your post and went to purchase the paint colors, and the martha stewart lampblack paint is discontinued. Do you have any other suggestions?
Hi Laura… I don’t think it matters too much. I would choose something glossy, like a semi-gloss latex, and maybe add some extra fine glitter :)
Thank you!!!!!! I can’t tell you enough how much I appreciate you taking the time to make this tutorial!!!!! :)
Is this method ok for the sink in the bathroom mine doesn’t cone out?
Well… I guess if you wanted to tape off the sink, you could.
Can I do this on regular white marble countertop?
I’m sure you could :)
Do you have any suggestions for a black color to use in place of martha stewart paints? They are both discontinued :(
Beautiful countertop!! I would love to try this, but Im not so sure about the gold. do you think this would look just as good with silver leaf and silver glitter? what colors do you suggest for the “sponging” if I go with silver? gray and white?
Thank you so much for your help!!
Karen
Hello, I watched this video and LOVED your countertop, and of course tried myself. In the video you mentioned you didn’t like your first attempt and redid it. I am in a similar situation and was wondering how did you begin the “redo” process? Did you strip away your first attempt & if so after applying the epoxy how??? Thank you for sharing. This process saved so much money!!!
Hi Nicole, I just primed right on top of the epoxy, then repainted and poured on top of the previous layer. Worked great!
Hey very nice blog!
Loved the video very helpful!! My question is my flat surfaces are wonderful SUPER GLOSSY like a sheet of glass!!! I love it but my back side pieces in spots looks awful lots or drippings, I thought I had it under control and looked fine till it started to dry. Now should I redo the entire counter top or can I take the back off or should I just get more epoxy and go over it again till I get a smooth look? What are your thoughts? Mine are super black with extra fine black glitter peppered throughtout!! Like I said looks awesome till you see back.
Absolutely loved the tutorial, very detailed. I’m happy you even gave the colors. One question. did you sand the Laminate first before the primer?? mine has a shine to it the old cheap 80’s looking wood laminate. Thanks Crystal
You can put it in the washer, but not the dryer :)
I had a question did u sand down the counter? All other videos I have watched said they sanded down the counter
No, there’s no need. the primer allows the paint to stick… and there’s no way the paint can scratch or peel off later, because it’s encased under the epoxy.
Holy cow am I inspired! Can’t wait to get started. I just stumbled across your blog. I am wanted to do my kitchen counter tops. Do u have any advice? My goal is to have a white marble look
Sounds fun! I would paint it white, then use a very fine brush to draw on light grey paint. Good luck!
Marzi, thanks a lot for this idea.
The color of my laminate countertop is already granite-like and it is in good condition. Do you think I can just apply the Envirotex over it? should I sand it, will it stick if I dont? Many thanks
I wouldn’t sand it. It will stick!
Does spray paints work ? Can i apply metallic textured spray paints to the above project ?
I’ve tried using spray paint indoors before, and even though I taped things off, it creates a fine mist that kind of settles everywhere. I wouldn’t recommend it!
6/1/15
Hi Marzi – I watched your video on resurfacing your bathroom counter top, the results as many have said look AMAZING!!! Really captured that real stone look, I hope it is still holding up well. Does is scratch or scruff easy? I am getting ready to resurface my kitchen counter-tops. Other then the scratching, scuffing or any other surfacing blemishes, I have one more question I was hoping you could advise on… the laminate on my old counter is coming up in one spot. I am wondering how to address this? Couple of my ideas are to cut out the extra and hope it flattens, or cut it out and fill it. Or should I peel off all of he old laminate and apply the primer, paints and epoxy to the particle board underneath it?
No, I haven’t had problems with scratches or scuffing. I also had laminate coming up in one area. I actually screwed down the center of the bubble to get it as flat as possible, then primed, painted, and poured right over it.
Oh Marzi – I just sent you a post…. one more question, i read that the epoxy with yellow after long exposure to sunlight? Seems there is no sunlight in your bath room, but i have alot in my kitchen, will the sunlight be an issue?
I’m not certain… you can contact the company directly through their website with questions though. I had a couple questions when I did mine and they got back to me very quickly.
I love the high gloss finish of the epoxy you used. I have an old laminate clings in my kitchen and you’ve inspired me to refinish. I like the day one look that rustoleum transformations gives but I’d like to do the epoxy finish over that. Do you think that would work?
I think it would :)
This is a great idea and I would love to try it in my kitchen. I know that you said you can put the sink back in the same day but did you have to put any caulking around the sink?
The porcelain sink I put in was very heavy and won’t budge, so no, I didn’t caulk it. However, if you’re doing a metal sink in a kitchen, I would definitely caulk it.
1. How do you disinfect the counter tops without ruining the epoxy?
2. Where did you purchase the paint, primer and epoxy? They are sold out at my Home Depot and michaels does not have the epoxy.
3. How did you get a 50% coupon from michaels? I only see 40% online
I use Windex, it doesn’t damage the epoxy. I purchased the epoxy at Michael’s, but you can also order it from Amazon. Michael’s has different coupons depending on the week; they always seem to have a 40% one but every now and again they’ll have 50% off.
Home depot no longer carries Martha Stewart texture Lamp Black Metallic Paint. Would just metallic black work?
Yes, that will be fine.
Hello just got done my bathroom sink with using that epoxy, some area did not dry can I go back and do the process over? What would be your suggestions?
I’d recommend contacting the manufacturer, they have contact info on their website.
What paints do you recommend to replace Martha Stewart now that it is no longer being sold?
I really don’t think it makes much difference :)
Awesome tutorial! We were looking for an inexpensive way to recover our countertops. This is not only inexpensive, but it’s Beautiful! Thanks for going over each step in detail, it was great. I will be following your Blog. Thanks, Donna
Wait, it looks like you did something awesome to your cabinets too! Do you have a tutorial on that also???
Thank you for this! It is an inspiration and I am looking forward to trying it in a couple of areas in my home! This tutorial is detailed and the video provides the visual guidance needed for a successful project if followed. Thanks again!
Hi the song in the starting is very beautiful :D can I know which song is it? email me :)
great work…. just wonder if this can be applied to wood top directly? thansk!
Yes! I’ve done it with a wood coffee table.
Can you roll on the epoxy with a foam roller? I have quite a bit of space to cover.
Hi there,
Could I use a roller to spread out epoxy on countertop? Also I still have tape on from painting countertops last week. Should I score and remove this and re-tape before pouring? Or… Could I just wait 24 hours to score and remove tape after pouring? Thank you. It is scary cuz I don’t want to destroy it
I’mlooking for clothing and fashion suggestions at a reasonable cost. Someone can give me an idea of some good webpages or forums?. . Looks like all I search for is either geared toward teenagers or is extremely expensive fashion.. . Thanks!.
Hello,
Do heavy objects leave marks or impressions on the countertop? I read it might and am concerned now.
Thanks