Hand lettering is a hobby I’m passionate about, so I’d love to show you how easy it is to get started.
How to:
Word Play
- First I choose a phrase and write it down on scratch paper, circling the words I want to emphasize.
- Next I create an outline of a shape for the words. I’ll call this area the canvas. It can be something traditional, such as a rectangle or oval, or a shape to reflect the message, such as a fish, or a cupcake.
- Then I write the phrase inside the shape, creating a visual hierarchy: the words I circled should be biggest. I’m not worried about the lettering style right now.
- I examine the work as a whole. Will the letters fit?
- Check whether the message is easy to read. We read English from left to right, and top to bottom. If your words are placed in a different order, it will be confusing.
- Here’s what happens when I put “Keep Trying” up top. It reads correctly, but the bottom feels unbalanced. Hand lettering doesn’t have to be perfectly symmetrical, but I don’t want it to feel lopsided. Adding a phrase at bottom balances out the work.
Rough Sketch
- Now I’m ready for a rough sketch. Consider accent elements. Would a word benefit from having a frame? Or being written in a banner? Would dividers help balance the work? Check out my video on “Hand Lettering Accents” to learn more.
- Now I can consider the lettering. I like to pair contrasting letter styles for maximum impact: fine and bold lines, empty and filled letters, script and serif. I also consider the emphasized words and choose a lettering style to match. For example, I plan on making the letters in the word “change” go from dark to light to reflect the idea of change.
- I like to examine my work for areas where words can interact. Check the crossbars and tails of letters: can they loop around other letters? Or can they fill white space in a pleasing way?
Pencil Sketch
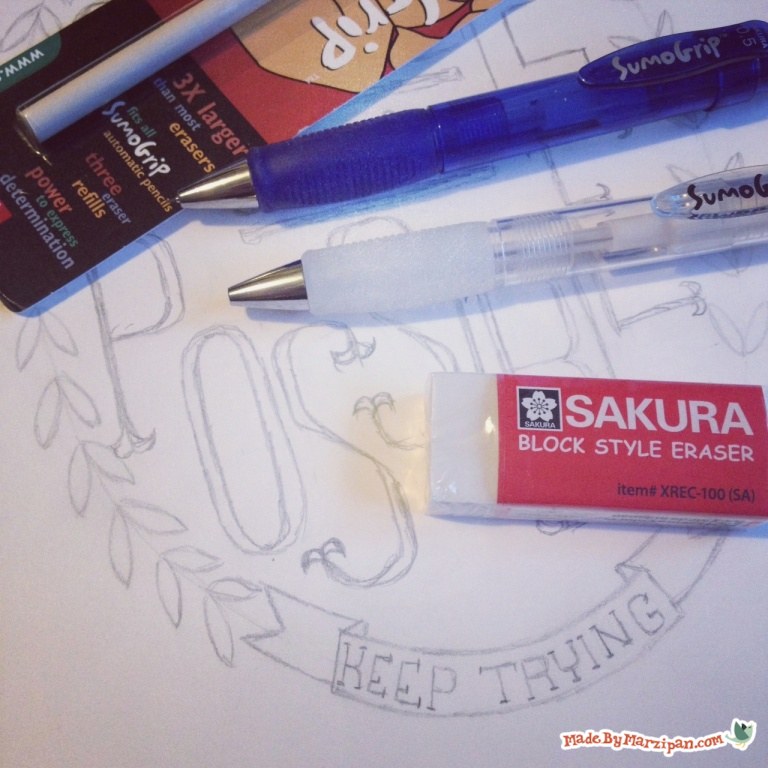
- Now we’re ready to work on real paper. My current favorite paper is Strathmore Bristol smooth surface paper. I like the larger size of this acid-free, heavy weight paper. I like to use a Sakura Sumo Grip mechanical pencil for sketching. It’s comfortable to use and the eraser is excellent. Use a clear ruler as needed. This one came in a pack of three from the dollar store.
- Your eraser is your best friend. Get comfortable with using it often. Draw and erase guidelines as needed.
- Take time when forming your letters. Sometimes it helps to not think of them as letters, but as shapes. For instance, if you think, “I’m going to write the letter A,” your hand will be inclined to form the letter A as you always do. Thinking in terms of shapes will help override muscle memory.
- Remember to pay attention to kerning, or the empty space between the letters. Try to keep an even amount of white space between each letter in the word. Sometimes it helps to count how many letters there are to find the middle, then start writing the word at the center point. Occasionally you’ll have a word that has some letters that are very wide and others that are very narrow. In this case, it’s best to write the word out and measure to find the center point.
Inking
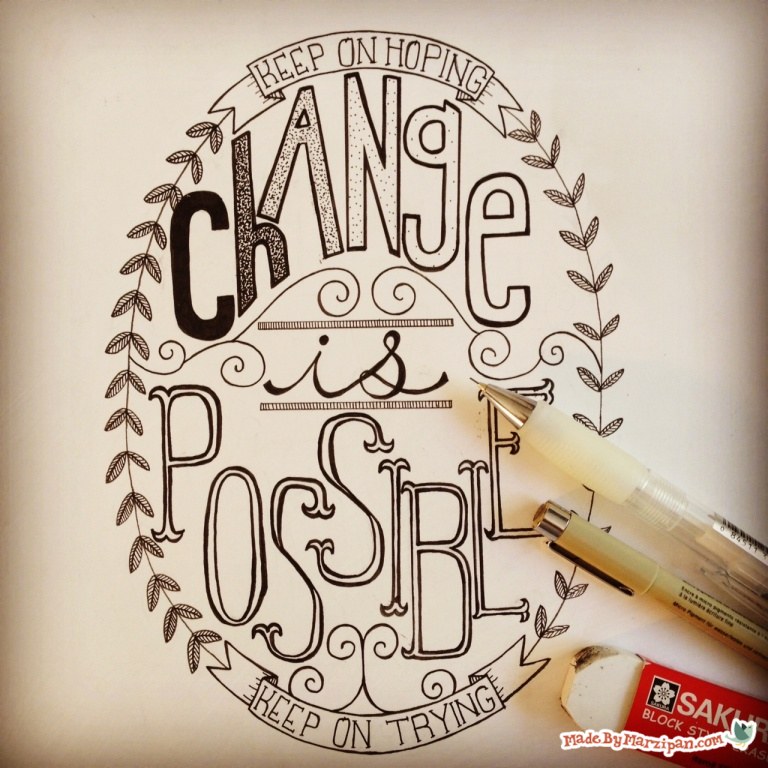
- It’s time to ink the artwork. At this point, your lettering should be just how you want it. You should be able to trace your letters without thinking. One thing that most hand lettering artists seem to have in common is the strong preference for Pigma Micron pens. Micron pens deliver consistent ink flow that won’t smear.
- After I’ve traced my work once, I erase all of my pencil marks. It’s important to use a good, large eraser for this.
- Now I’m going to ink my work a second time. The reason I do this is because I don’t really expect to get it just right the first time; my lines can be a bit wobbly. But if I trace my letters once, then I can fill in and balance those problem areas as I go over it a second time. The result is a bolder, smoother line. Not everyone does this, but it’s what works best for me.
- You may choose to add shading, fills, cross-hatching, or stippling to add the illusion of depth and texture to your work. If you’d like, you can fill in white space with accents.
Digitizing
- Your hand lettering is done, but what if you want to digitize your work to make prints? Scan your work at a high resolution in black and white mode.
- You can use basic photo editing software to increase the contrast and crop or resize your work.
- If you’d like to edit further, you can open your work in Adobe Illustrator. Go to Object > Live Trace > Make & Expand to turn your drawing into a path with points. Now you can edit and delete points as necessary. I do very minimal editing this way, because I want to maintain the hand drawn feel. I’m okay with my work not being perfect; if the goal was perfection, I just would have typed this phrase to begin with. So I only fix mistakes that would distract from the finished piece.
- Sometimes I like to color my work digitally. This is fun because it’s easy to experiment with different color combinations without risking ruining the original. I prefer to add color in Photoshop. You can fill large areas with the paint bucket, or make a Multiply layer and color in areas with the paintbrush.
Made By Marzipan may have received product or payment for this post. Posts may contain affiliate links. Disclosed in accordance with the Federal Trade Commission's 16 CFR, Part 255.

 Finished?
What a great tutorial and video! I’ve been struggling with my hand lettering, and this really helped clear some things up. :)
What a perfect way to show how to hand letter! I just love this!
this is the bomb-diggity tutorial!
Tht’as the best answer of all time! JMHO
What a wonderful tutorial! Thanks. I found particularly helpful the spacing hints, that’s my biggest challenge.
BTW Love the delightful background music. What song is that?
I love this! I want to learn the lettering process to use for my own greeting cards (rather than stamps and premade sentiments, I like to use my own). Please do more as I enjoy watching and learning, in meantime I will keep practicing… :)
Nicely done wish I could do this
thank you, really, thanks. Go on
How long does it usually take you to complete a project?
Love it, thank you very much… I was of those who asked for it ! Useful, I’m trying to make one right now, the hardest part (to me) is to find fun and original “font”. I use to have my own handwritting and then when I shape them to make a font I feel I always tend to make the same… when I look yours they’re all different.
Got to train more.
XOXO, Lilou from France ^_^
Thanks for this
Great tutorial, Thank you :)
What editing software did you use?
Cool marzipan I really love it
You have an amazing channel
Keep going GOD bless you dear
What a great tutorial! Thanks for taking the time to make it. I really appreciate you including the process you go through to get your design shape. I’m new to hand lettering and this will help a lot. :)
Pretty nice post. I just stumbled upon your weblog and wished to say that I’ve really enjoyed surfing around your blog posts.
After all I will be subscribing to your feed and I hope you write again very soon!
Great stffu, you helped me out so much!
Simply amazing! THANK YOU so much!!! I can’t even tell you how helpful your few tutorials are. You are a great teacher. I’m just a beginner and I feel like I’m going in the right direction!
I’m so glad you found it helpful!
Cool article, It was inspiring.
THANK YOU SO MUCH! I have been looking for something like this and it’s been so helpful!