I’m a self-taught sewist, which means I learned a lot of things the hard way. It seems as though there are some sewing facts you’re just expected to know, so they aren’t even mentioned in most sewing books or written on patterns. I thought it would be helpful to go over these basic sewing tips in one video for beginning sewists.
FABRIC
Let’s start by talking about fabric. Most fabric is bought off a bolt that is either 36 inches, 45 inches, or 54-56 inches. 45 inches is most common for fabrics like quilting cotton, so purchase that size if a project doesn’t specify the bolt length.  Some projects call for “fat quarters.” These are pieces of fabric cut to about 18 x 22 inches.
When buying fabric, be sure to read the care instructions on the bolt. You may find it helpful to take a picture with your phone.
When buying a natural fabric like cotton, I always wash and dry it before cutting, as it can shrink. Most synthetic fabrics, like fleece, won’t shrink so they don’t need to be pre-washed.
You’ll notice that your fabric has a border with little holes punched in it. This is called the selvage and you don’t want to use this in your project, as the weave and tension is different from the rest of the fabric. Trim off the selvage when cutting your fabric. 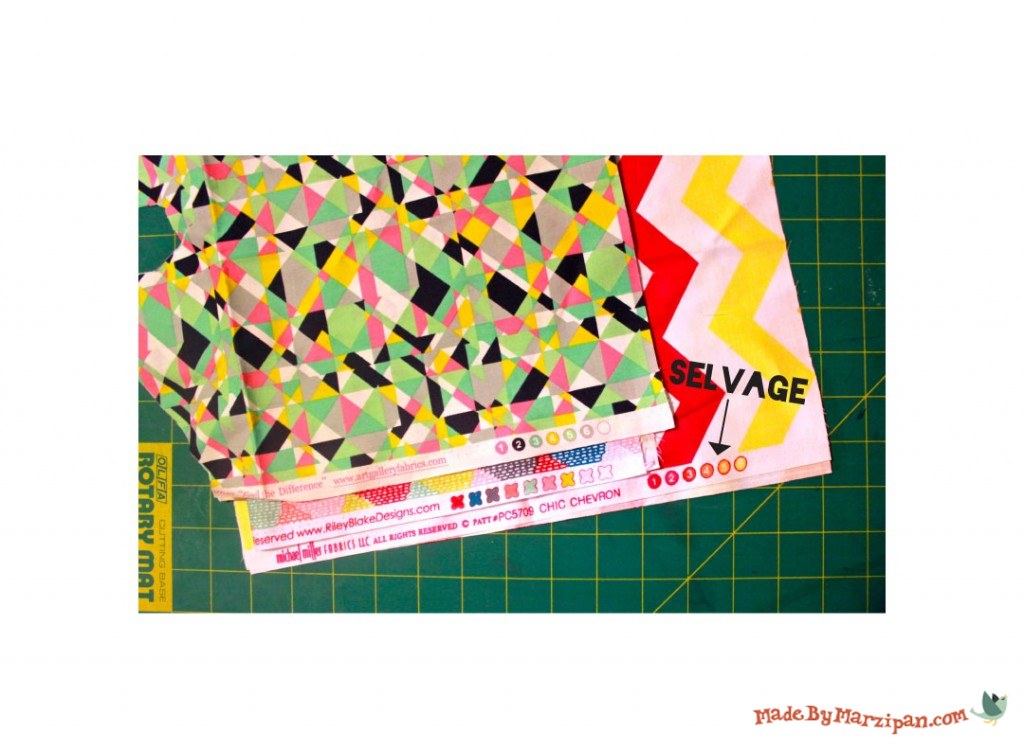 Your pattern may have instructions about cutting with the grain, or cutting on the bias. The grain of the fabric runs perpendicular to the selvage. The bias is the diagonal grain, at a 45 degree angle to the selvage. Fabric cut on the bias has more give to it and will stretch some when you tug it. This means it’s good for going around curves, and for draping.
When cutting fabric, it’s best to use dedicated fabric scissors. Even if you can’t afford a fancy pair, it’s worth buying an inexpensive pair of 8-inch scissors that you reserve only for fabric. When cutting out paper patterns, use a different pair of regular scissors so you won’t dull your fabric scissors.
If you plan on doing a lot of quilting, you’ll want to invest in a rotary cutter, clear quilter’s ruler, and cutting mat.
STITCHING TIPS
When I first started sewing, I went two years without bothering to learn about all the accessories that came with my machine. I sewed baby bumpers without ever realizing I had a walking foot… I didn’t even know what a walking foot was! Take the time to learn what each sewing machine foot is for. Check your manual to see what that funny-looking stitch is all about. These are things that were invented to simplify the sewing process and make it more enjoyable, so take advantage of them.
Pay attention to what your machine is telling you. If you’re sewing and hear a thumping sound, stop and check your bobbin. If the fabric is hard to feed through, stop and check your tension. If the thread is strained or snapping, stop and rethread the machine, not just the needle. Yes, it’s tempting to plow on ahead to finish your seam, but if you ignore what your machine is telling you, you’ll probably find a mess on the back of your project and you’ll waste a lot of time unpicking it.
Don’t sew over pins. I used to in the beginning, because no one had ever told me not to. But I found that sewing over pins can lead to broken needles, and once I damaged my bobbin case when the needle hit a pin, and it had to be professionally repaired. Besides, sewing over pins can cause puckering in your finished project. So slide out the pins as you come to them.
PROFESSIONAL PROJECTS
This next tip is really, really important, makes a big difference in how professional your finished project looks. When you sew fabrics right sides together and the next step is to turn them right side out, you need to clip and notch the seam allowance first. If there’s a corner, snip off the excess fabric at a 45 degree angle, being careful not to snip your stitches. If there’s an inward curve or corner, clip the seam allowance with a straight snip. If there’s an outward curve, notch it by cutting a V.
At first I would forget when I was supposed to clip and when I was supposed to notch. I had a friend remind me to “Notch your mountains!” So immediately I thought of a Nacho Mountain.  It’s silly, but I haven’t forgotten to notch curved mountains since!
The second most important thing you can do is to press or iron frequently. Some tutorials leave the instruction out entirely, assuming that you already know you’re supposed to press. Pressing will give you crisp seams and will make the various pattern pieces fit together the way they should.

The exception would be synthetic fabrics that can’t be ironed. However, you can get a crisper seam on those projects by rolling the seam between your fingers to define it.
Depending on the project, an additional step you might consider is topstitching. When you turn a project right side out, you have a hole remaining that you pulled the fabric through. If you want it to be invisible, you’ll need to hand-stitch it with a ladder stitch. But most projects call for you to machine-sew it shut close to the edge. It does the trick, but it doesn’t look very professional.  However, if you continue to topstitch all the way around the project, it defines the seam and is a nice finishing touch.
I do my best to point out basic steps like these in all of my tutorials, but not everyone does, so I hope this post has given you a heads-up. If you have any essential tips for beginning sewists, please add them in the comments!
Nice inf… Thank you
You are so right about being expected to know. I’ve been sewing for many decades but still learn something new or am reminded of something I knew but didn’t take advantage of. TFS… dee
Fantastic tips even for old timers like me! Love “Nacho Mountains”!! I always have trouble remembering that!
This was so informative, thank you so much. I’m new to sewing and need all the help I can get, lol. Lee x
Thank you so much for the tips….I know they will come in handy.
Thanks for sharing! These are great tips.
Thank you!!!!
This what I was waiting for
Very rich in information ,
I love your sewing machine * whats its model ?
I’m not completly sure but I heared somewhere that if you wash your fabric and if you don’t use it for a while, when you do use it, it will easyly brake or not be as good? I hope I made sence.
This was really helpful. Im sort of a self taught sewist, my grandmother taught me a little bit, and in high school i took a fashion class, but I didn’t learn anything more but a couple of stitches and how to work a sewing machine. I took one if the fashion books because the class was discontinued the year after. I haven’t read it yet, but I’m pretty sure what’s in the book you already said, but made it easier to understand. :-D
TFS great tips! Rosemarie
I just watched your tutorial on YouTube on assembling a log cabin block…very helpful. Would it be possible to find out how you assembled it?
You bet! It’s found here: http://www.madebymarzipan.com/?tutorial=how-to-assemble-a-block-quilt
Marzi, I am fairly new to quilting, and have begun with a baby quilt. Unfortunately, because this process was new to me, I didn’t really think about the later part of the quilt. I made the backing red, the front is a combination of red, blue/white gingham, and creams. Because of my newness I am concerned if I quilt with red it will show on the quilt top, if I sew with cream or a light colored thread it will definitely show all my inconsistencies on the back. What do you recommend? Also, I didn’t know to prewash, and with the quilt already sandwiched, will the red bleed on to the top? Thank you so much, I love your tutorials, they are the most informative and easiest to follow. Thanks again!
Hi Christie, great questions! You have a couple of choices. 1) Sew with a clear monofilament thread. Although, this can be a little trickier for the novice sewer to get the tension just right. Or 2) put red in your bobbin and use a cream spool on top. That’s what I would recommend. Test a small area first (without backstitching) to make sure your tension is correct, so neither of the threads show on the wrong side. I wouldn’t worry about the red bleeding, these days most fabric manufacturers are careful to use colorfast dyes. It may shrink a bit, but if you used all the same TYPE of material (i.e., all cotton or all flannel), it won’t cause any big problems. Feel free to come back and share your finished work!
Good information. I have been on the machine for a while now, however this is still useful for me.
Yes I sew but I’m new at quilting. My problem is cutting. I have used the roller blade & scissor. My finished blanket looks terrible. Please make some suggestions. Thanks Marie