My sister recently bought her first house, and was excited to finally pick out paint colors. She’s a bit of a perfectionist (okay, a BIG perfectionist), so we ended up painting her kitchen twice within a couple of weeks. After a few painting mishaps, we finally hit on a method that gave us nearly-perfect results for painting corners and edges.
First, a run-down of the things that didn’t work so well. We taped, of course. I’ve tried several brands of tape, including Scotch Blue, Frog Tape, and an industrial painter’s masking tape. They ALL have seepage in some areas, especially along ceilings. You get a false sense of security with tape; you think you’re covered, tra-la-la, and then you peel it back to reveal a nightmare like THIS:

But… we taped! What is the point of taping if this happens anyway?!
That’s when we put our hope in gadgets. A foam brush with square edges and an angled handle. Rectangle “trim rollers” with little wheels. These were somewhat better, but they still didn’t cut it for my perfectionist sister. She looked online, and found a tip about using caulk to seal the edge of the painter’s tape. I won’t even go into that one, because it was a DISASTER, and I’m pretty sure it was posted by a DIY sadist. And then, lo, we tried a technique that gave us this result:

Cue singing angels. Look how beautiful! So, I’m going to tell you how to do it, but you should know that it does take more time upfront. I know you’re impatient to get your new color up, but trust me, you’ll be so happy you took a little extra time now instead of trying to touch up all those drips with an itty bitty paintbrush later. Okay, here we go:

1) Use painter’s tape and tape the edge just like you normally would. (For example, if you’re painting by a ceiling, add the tape to the ceiling. See photo above.)
2) Get out the EXISTING paint color of the surface that is adjacent to the wall you’re painting. (In our example, you would be getting out the white ceiling paint. It’s counter-intuitive, but stick with me.)
3) Paint over the edge of the tape. (In our example, you are painting along the tape with white ceiling paint, where the wall and ceiling meet.) You’re going to get some on the wall you planned to paint in the first place. I know it doesn’t match. It’s okay. It’s good. Really.
4) Let it dry completely. Do not remove the tape!
5) Now paint your wall with the new color, like you wanted to in the first place.
6) Let it dry, then peel off the tape. Ta-da! Gorgeous edges.
Why does it work? Well, no painter’s tape is perfect. At least none that I’ve found. Sad fact: paint will seep through. But when you paint over the tape with your ceiling paint first, the color that leaks is white (which is fine, because it matches the ceiling), and then it seals the tape when it dries, creating a barrier that the wall color won’t seep through. So yeah, you have white paint on your wall for a little while, but then you paint right over it with your new color, and the new wall color won’t transfer to the ceiling.
Okay, let’s look at some pictures of this on a wall, since it’s a little bit tricky to wrap your head around this concept at first (at least it was for me, maybe it was the paint fumes)… Here we have a corner where beige meets blue. Blue is the new color, beige is the existing color.
1) Tape as you normally would (in this case, that means taping on top of the beige).

2) Get out the existing paint color (in this case, beige).
3) Paint along the edge of the tape where the walls intersect, using the existing paint color. You will get it on the other wall, that’s okay. It’s good. Really.

4) Let it dry. Leave the tape on.
5) Paint with your new paint color (in this case, blue). The tape will be sealed by your previous paint job.
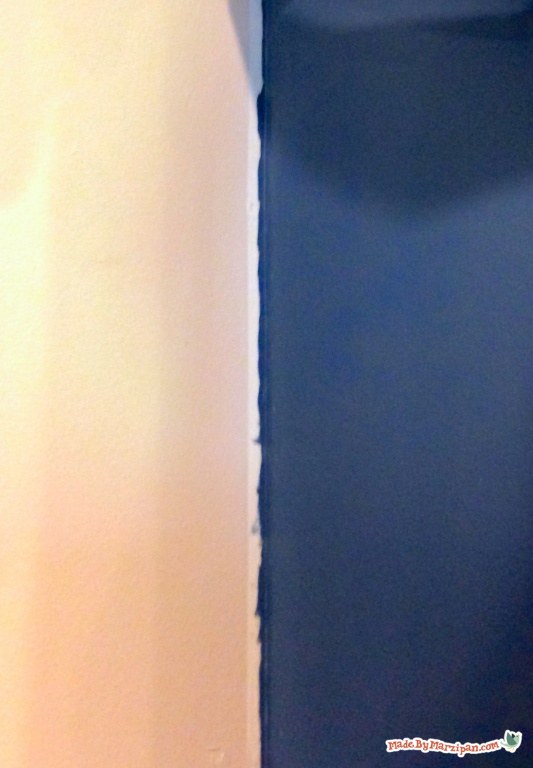
6) Take off the tape. Drumroll, please…

A perfectly painted corner! I know these pictures aren’t the greatest; this is actually on top of a cabinet and we were standing on the fridge :o But hopefully you get the idea.

Lovely, no? And so worth the bit of extra time upfront. If you have any tips for professional painting, leave them in the comments below :)
UPDATE: Check out a video tutorial of this process here!
Love the drama and your presentation. I can feel the sincerity. I can read your tutorials for enjoyment and learning. Thank you!
The genius store caeldl, they’re running out of you.
I wonder if this is how PROFESSIONAL, expensive painters get such a good result?
I love the technique and can’t wait to try it.
(By the way, I found this site through YouTube and your log cabin quilt instructions: very helpful and clear, thank you.
Learning a ton from these neat arteilcs.
Bravo! I have been reading about this technique & could not wrap my head around this completely until now. Thanks to your great pics & clear instructions, thank you!