1
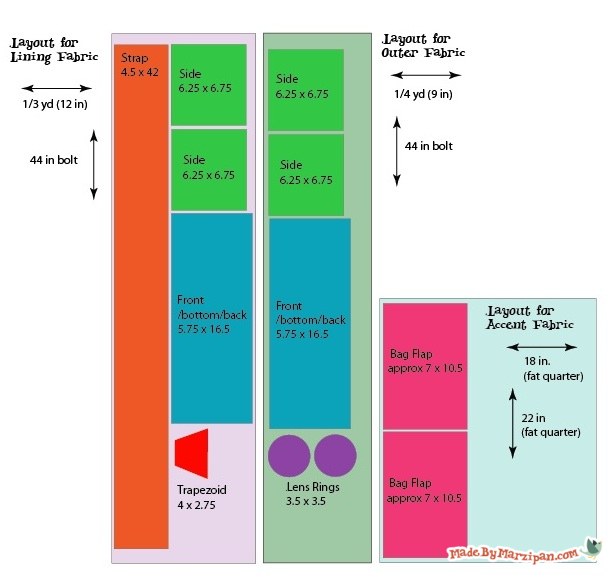
Follow the directions on the cut list to cut out all of your pieces. (You can fold the fabric in half to cut two pieces at once.) Cut out the batting at the same time.
2
As you cut out the fabric, you may want to cut up the layout paper as well, pinning each paper piece to the coordinating piece of fabric. This will help you keep track of everything.
Creating the Applique Pieces
1
We’ll begin with the appliqué circles and trapezoid. Put both coordinating pieces right sides together, then sew all the way around with a ¼ inch seam. Do this for both sets of circles as well as the trapezoids.
2
Trim off the excess fabric at the corners and notch the seams of the circles.
3
Pinch the two layers of fabric and pull apart. Carefully snip through one layer only to create a hole for turning. Turn the shapes right side out. Roll the seams between your fingers to define.
4
Press all three shapes.
5
Pin the trapezoid to the front of a bag flap and batting piece. Place it about a quarter inch below the straight bottom edge. Stitch in place close to the edge of the trapezoid, with a 1/16 seam. (You can topstitch decorative horizontal stripes on the trapezoid if you’d like. I ended up doing that later.)
6
Then stitch the small lens circle to the larger ring circle in the same manner.
7
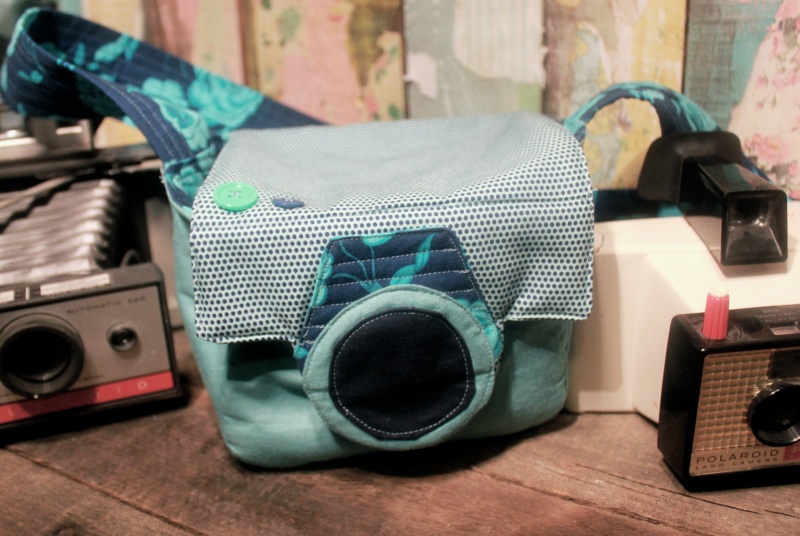
Place the sewn circles ¼ inch away from the bottom of the bag flap arc and sew in place.
Making the Bag Flap
1
Pin the two bag flap pieces right sides together. You’ll be sewing on the batting side so you can see your previous stitches.
2
Sew together with a ¼ inch seam.You should be sewing just a little below your previous stitches on the arced portion. Leave the top straight edge open.
3
Trim the corners and notch the curves. Turn right side out and press.
4
Topstitch around the perimeter of the flap with a 1/16 seam, again leaving the top open.
Magnetic Closure
1
Now we need to add the closure. I’m using a magnetic snap closure. Mark where the magnet will go on the back of the flap. Make a careful snip through only one layer of fabric.
2
Add a piece of punched cardboard to prevent the fabric from ripping, then slide on the metal backing. Close the prongs.
By the way, there’s no need to worry about the magnet, it won’t harm your camera or SD card in any way. They contain non-magnetic storage media, so magnetic fields near those devices can’t delete data (source).
Sewing the Strap
1
Fuse the interfacing to the back of the long strap piece with an iron.
2
To sew the strap, fold the strap piece in half lengthwise, right sides together. Sew along the raw edge with a ¼ inch seam.
3
Turn right side out with a loop turner or tweezers. Press. You can add rows of decorative topstitching ¼ inch apart.
Making the Bag Body
1
We’ll make the outside of the bag first. Lay the longest rectangle face up with the coordinating piece of batting beneath.
2
Take one of the “side” rectangles along with its piece of batting, and center it face down in the middle of the longest rectangle. Measure to be sure it’s centered.
3
Pin and sew along the top edge only, with a 1/4 inch seam. Begin and stop sewing about ¼ inch away from the edge, as this makes it easier to join the sides later.
4
Repeat with the second side rectangle, adding it to the bottom edge of the longest rectangle. Your piece should now be cross-shaped.
5
Next we have to join all the sides. To do this, line up the adjacent sides of two rectangles and pin. Sew with a ¼ inch seam.
6
Repeat with all sides to make a box shape. Poke at your corners to double check that they’re securely sewn.
7
Repeat the previous steps to make an identical bag (without batting) from the lining fabric.
Assembling the Bag
1
Now it’s time to put it all together. The outer bag should be inside-out with the batting showing. The lining bag should be right-side out. In other words, when you put the lining bag inside the outer bag, the right sides of both bags will be touching.
2
Insert the bag flap between the two fabric layers. The appliquéd side should be touching the outer fabric. Extend the edge of the flap about ¼ inch past the edge of the bag for extra durability.
3
The strap also needs to go between the fabric layers. The strap itself should be tucked inside the bag, with the ends protruding upward about 1 inch for durability.
4
Pin the remaining edges, aligning them evenly. Sew around the bag with a ¼ inch seam, leaving a 3-inch hole in the center front of the bag for turning.
5
Turn right side out through the hole. Tuck the lining bag inside of the outer bag.
Finishing Touches
1
To make the strap more durable, sew a rectangle with an X through it on the sides, where the strap sits between the fabric layers.
2
Add a row of stitches where the flap meets the edge of the bag, above the trapezoid. This helps the bag to close more naturally.
3
Add the coordinating closure piece to the front of the bag. Then fold the raw edges of the hole inward and topstitch all the way around the bag.
4
You can stitch along the bottom sides of the bag to add more definition.
5
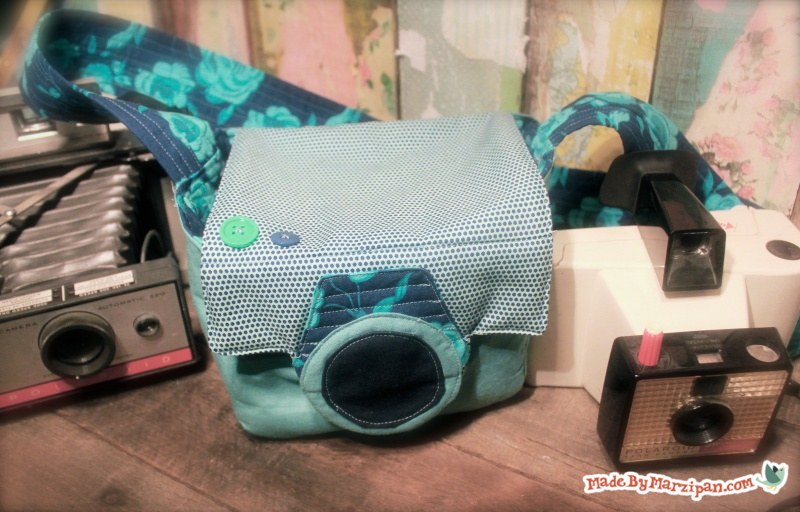
You can also sew some buttons to the top of the bag to mimic camera buttons.
Click to find more free sewing patterns for bags!

 Finished?
I love the website. I subbed you on youtube. I love all your ideas. I love to sew, so I am glad to see that you have great ideas for sewing.
This is super cute :) I was just looking into getting a new camera bag. I can’t wait to try this out!