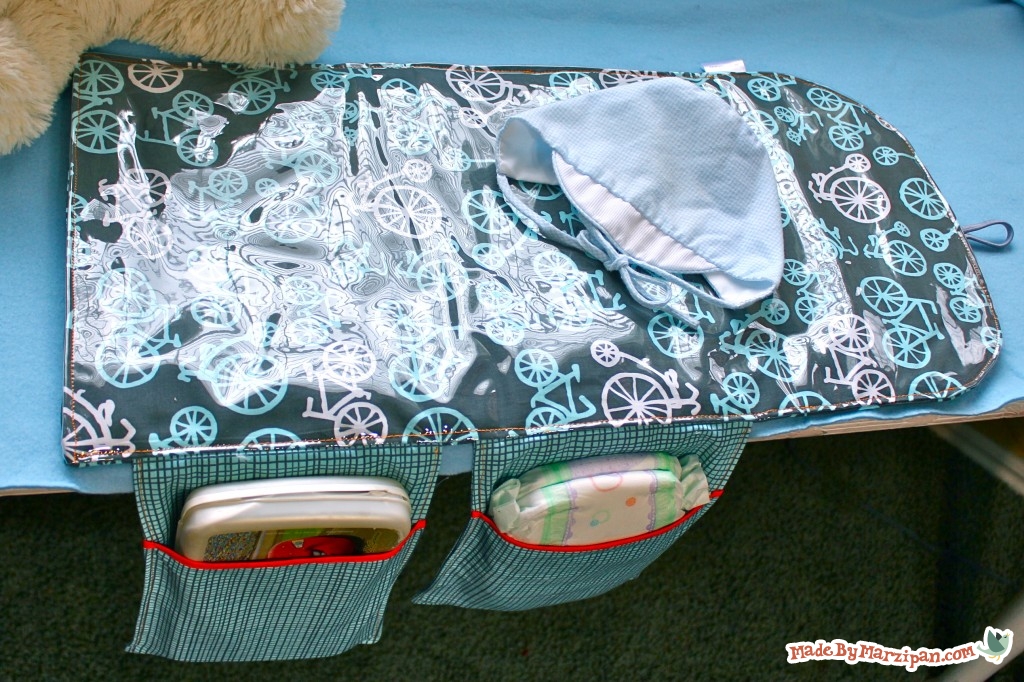
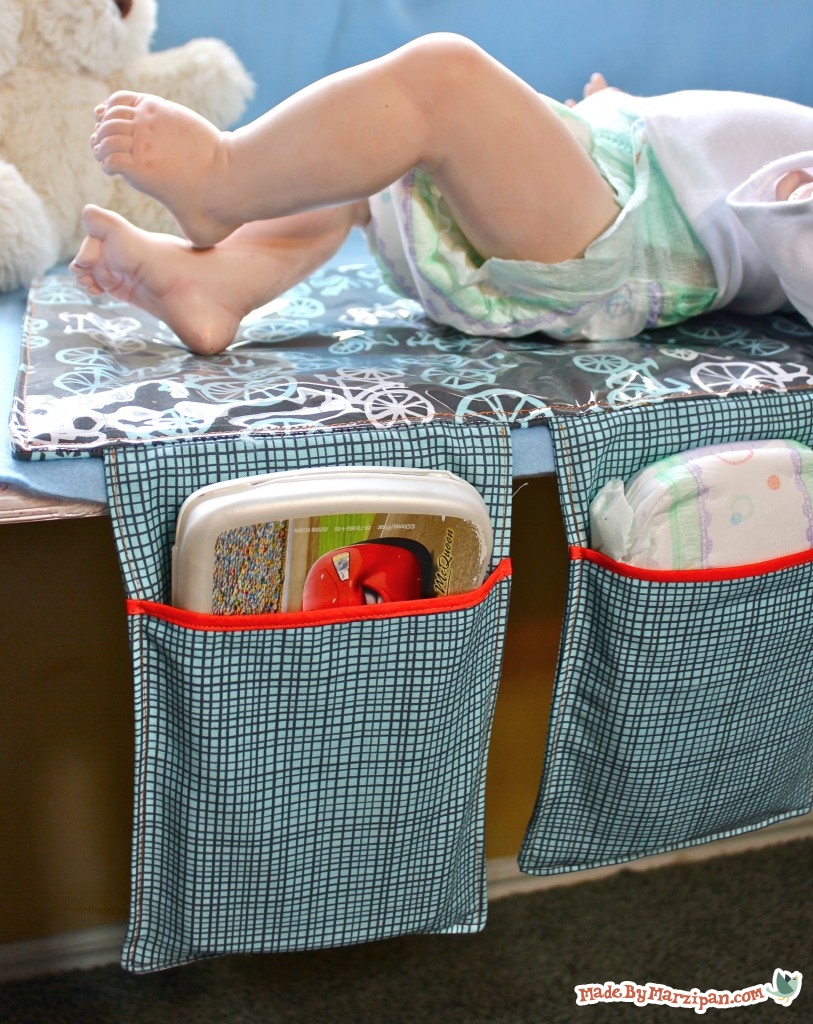
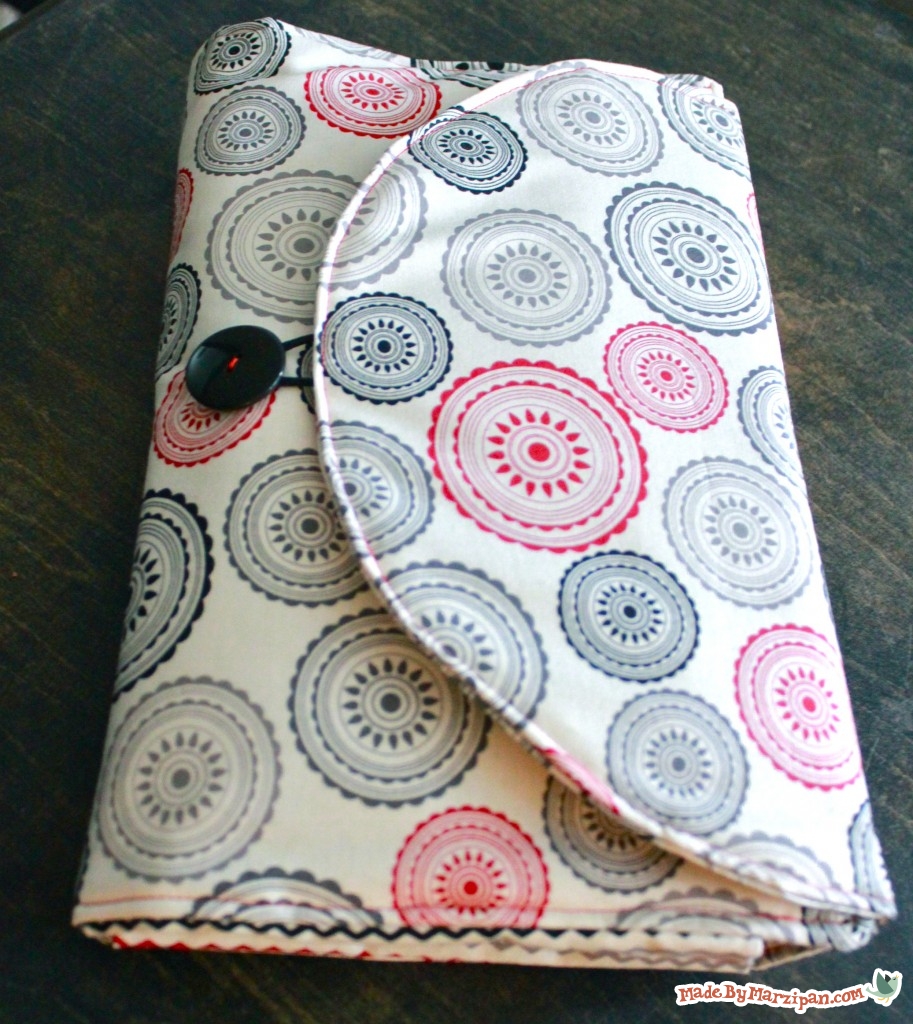
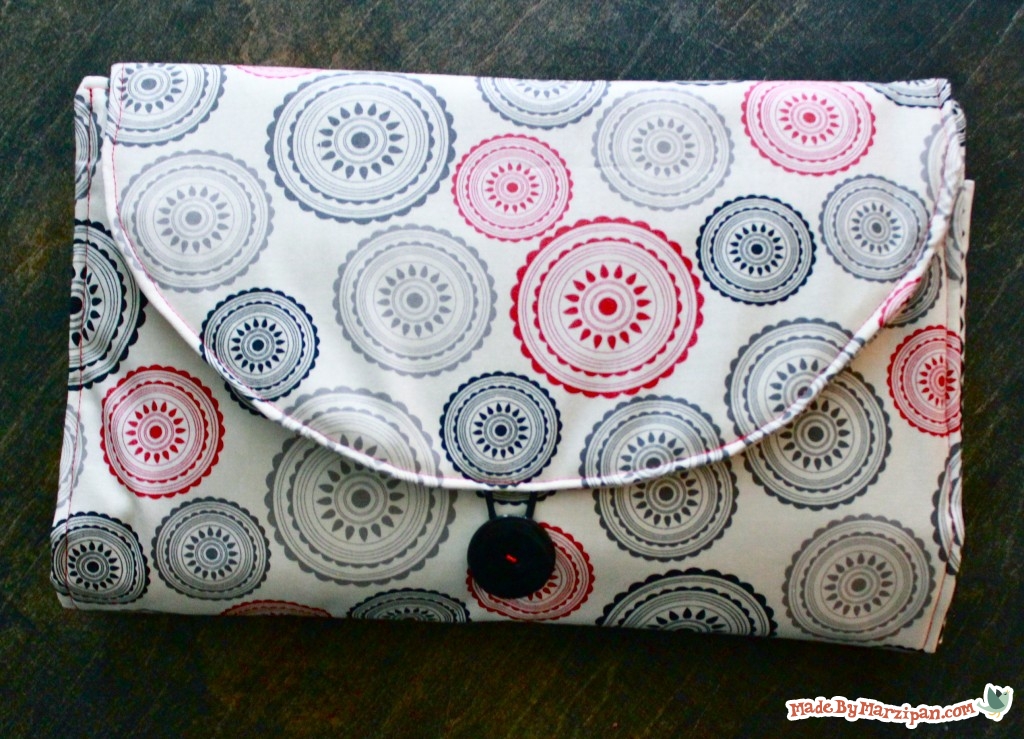
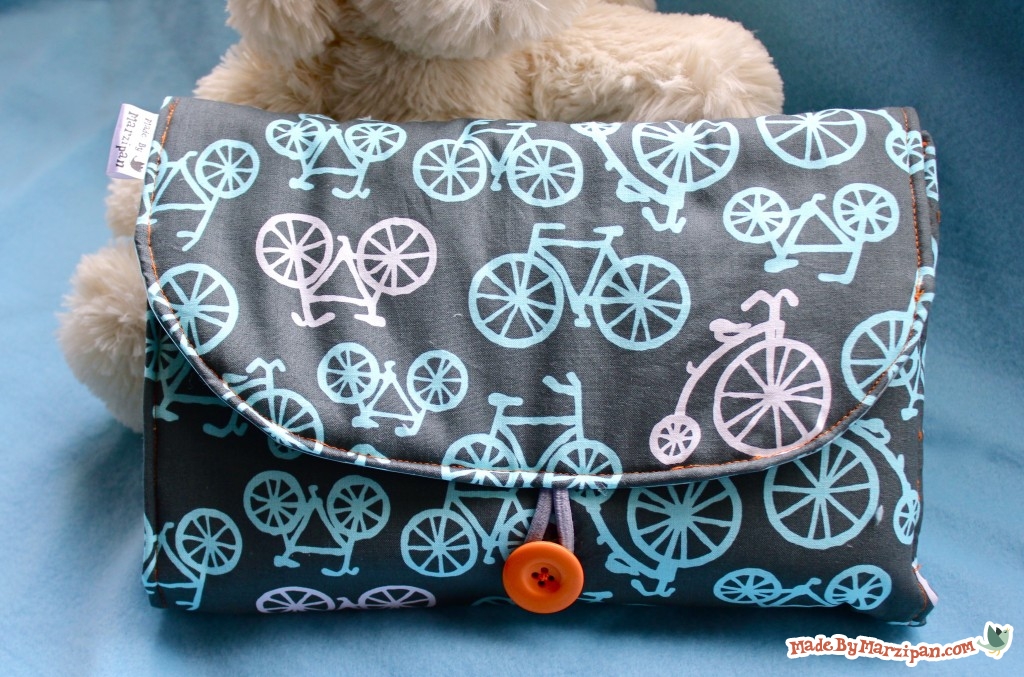
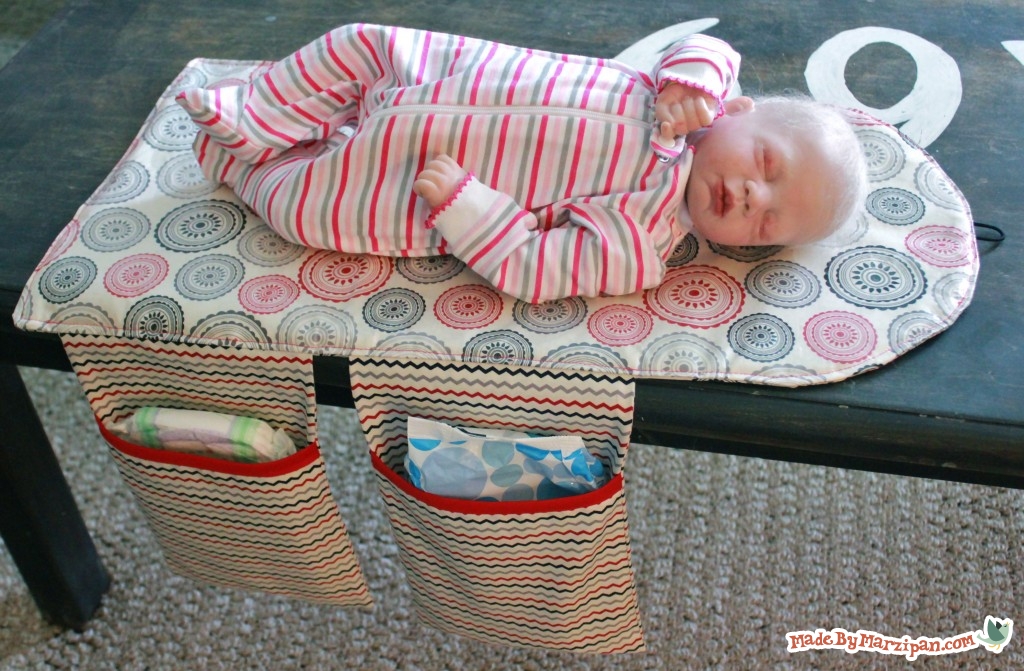
The All-in-One Changing Mat features a wipeable vinyl surface, two hanging pockets for diapers and wipes, and an elastic closure that can be fastened with one hand. It folds up into a tidy clutch.
Tips:
1
You can use regular clear vinyl for this (typically sold off of big rolls, and often used for tablecloth coverings), or you can use iron-on vinyl (typically sold off the bolt, by the interfacing). Iron-on vinyl is thinner and easier to sew through, but be very careful not to touch the iron-on vinyl directly with the iron.
How to:
made with
⅔ yd cotton (main)
½ yd cotton (pockets)
Cutting Measurements:
Main Mat: 23 x 12 in.
Vinyl: 23 x 12 in.
Pocket Backs: 21 x 7 in.
Pocket Tops: 15 x 7
1
Start by ironing your fabrics. Cut the pieces to the measurements listed. First we’ll work with the smaller rectangles to create the tops of the pockets. Fold the 15 x 7 in. rectangles in half, wrong sides together. The pattern should be on the outside.
2
Add decorative bias tape to the folded edge. (Bias tape trim is optional, but it makes your project look polished.) Sew in place.
3
Now we’ll add the pocket tops to the main pocket pieces. Fold the 21 x 7 pocket pieces in half, right sides together. Press the fold.
4
Lay the pocket top piece on top of the main pocket piece, lining up the raw edge with the center fold line. Fold the main piece in half again, enclosing the pocket top. Pin the edges.
5
Sew the sides and bottom with a 1/4 inch seam, leaving the top open. Turn right side out and press. Repeat with the other pocket. Set aside.
6
Now we can work on the mat. (These pieces should have been cut to 23 x 12 inches.) If you are using iron-on vinyl, iron it to one cotton mat piece now. Lay the batting down first, then place a piece of fabric face-up on top of the batting.
7
I’m adding a business tag, but you can skip that if you don’t have one. Pin the elastic to the center of one short end. If your elastic has a metal clasp, pin it so the elastic hangs off the edge, we can trim it off later.
8
Next add the pockets. Measure two inches in from the edge without the elastic, and line up the raw edges of the pocket with the side of the main piece. The pocket should be face-up. Add the second pocket 1 inch away from the first. (Put both pockets on the same side, as they’re designed to hang off the side of the changing table.)
9
If you’d like, you can curve the top edge of the mat by tracing a plate with chalk and trimming off the corners.
10
Now pin the vinyl to the top of the other main mat piece (the piece without the elastic & pockets). I suggest pinning this separately, and pinning it very well, because you want the vinyl to be as smooth as possible.
11
Once this is pinned, lay it face down on top of the other mat piece and batting. Right sides should be together. Pin in place.
12
Sew with a 5/8 inch seam, leaving the bottom edge (without the elastic) open for turning. When you reach the elastic, backstitch over it for durability.
13
If you curved the end of your mat, you’ll need to notch the curves before turning right side out. Be careful not to snip your stitches. Trim the metal clasp off the elastic.
14
Press the outside of the mat, the side without the vinyl. Be careful not to touch the vinyl with your iron.
15
Fold in the bottom raw edge a 1/2 inch and pin. Topstitch with a 1/8 inch seam, and continue to add a decorative topstitch all the way around your mat. Consider using a contrasting thread for a pop of color.
16
Finally, we’ll add the button. Fill the pockets, then fold the mat into thirds. Use chalk to mark the center of the elastic, and sew a button there. Pinch the fabric so that you are sewing through the top layer only.
Now you’re ready to grab it and go!
Click to check out Made By Marzipan’s other sewing projects for baby.
Made By Marzipan may have received product or payment for this post. Posts may contain affiliate links. Disclosed in accordance with the Federal Trade Commission's 16 CFR, Part 255.

- Jessica L. Rae
- Meghann O.
- Cristina
- LeeAnn
- Sarah
- Melissa
- Courteney
- Lynn
- Lynn
- Anni
- Cadash
- Roxy Bee
- Alissa
- Teagan
- Momma Cooper
- Momma Cooper
- Sally
- Ruth
- Kara
- Deborah
- Ines
 Finished?
Show it off!
This is perfect — will be making one this week for my new grandbaby coming in July. Love your tutorials and your style!!
I’ll be making one also for my grandbaby in July
Thanks, Brenda! Feel free to share your finished project right here in the comments section, we’d love to see what you create!
Deborah, it’s adorable! I love the fabric you chose, and the bright button. Great job!
This was my 2nd sewing project and I’m really pleased how it turned out. I made a few tweaks – I added a loop handle for hanging off the pram and instead of making a pocket for the wipes, I used elastic so I could open the wipes without having to take them out of the pocket. I love your projects! Thank you. (I took photos but can’t seem to upload them)
I am curious about the elastic for the wipes. I’ve thought about cutting and trimming an oval hole, so the wipe didn’t have to be taken out of the pocket.
It was a nice idea! I could have used some more specific information: gauge of vinyl, batting thickness, stitch length, etc. as those variables seemed to cause all sorts of mayhem with my machine and project. Even with the help of an experienced helper (my mom), we had a lot of trouble. Hopefully we’ll figure out how to get it finished for a baby shower tonight. . .
Sorry you had trouble, Sara. I didn’t mention specifics like batting thickness and stitch length, because it really shouldn’t have much effect on the outcome of this project. I think the problems you’re having might have more to do with finding the right sewing machine settings based on the materials you chose. As you become more practiced with your particular machine, it will become easy to tell when you should lengthen your stitches, increase the tension, switch sewing machine feet, etc. Best of luck!
Hey I have a question on the care of this… can you machine wash this if it is on cold? Also I am assuming because of the vinyl you should not put it in the dryer. I you could please e-mail me at christelleleanne@gmail.com that would be great! Thank you! :^D
Hi, Christelle- yes, you could machine wash this and hang to dry. But, I designed it with the thought in mind that I’d like to be able to wipe it down with Lysol disinfecting wipes on-the-go. Some people have wondered “Why would you put vinyl on this? Vinyl isn’t soft and snuggly for a newborn baby!” But as a mother of 3, I know that accidents happen, and I don’t want to roll up a soiled mat to put it in my bag! Disinfecting wipes are portable and will clean the mat just as well as a washing machine :)
Glad to see that it’s machine washable – I love that the baby side can be washed down with a clorox wipe, but I hate to think that the outside of the beautiful project will be on gross, dirty changing tables!! What a great project – Thank you! Can’t wait to use this!
You can definitely cover both sides with vinyl if you’d like :)
So I don’t think my last post worked! Oops! Well I had care instruction questions… Is it machine washable? Also I am assuming because of the vinyl you shouldn’t dry it in the dryer.
We have a couple in our church who are expecting twins in about a month. What a great gift idea! I can make it to fit their nursery decor!
i am sewing this project atm but im having troble in the final steps with the vinyl sticking to my machine and it will not feed through.any advice would be great…
Mikala, vinyl can be sticky to sew through! There are a couple things that could help. 1) Try adhering a piece of Scotch tape to the bottom of your sewing foot. The smooth surface of the tape will help it glide. 2) Sew through a layer of tissue paper along with the vinyl. When you’re done sewing, tear off and discard the tissue paper. Hope this helps!
I use toilet paper not tissue. It is easy to find and tear off.
I had a hard time with the vinyl as well. I ended up using PUL fabric which worked much better. There is a teflon sewing foot out there for materials like this. I have one, and it works beautifully. I don’t remember where I got it, but it was rather inexpensive. It snaps on just like any other sewing foot. I sew with the PUL fabric on top to make sure that I sew over the pockets properly and it works very well.
Debbie
An easy solution for vinyl sticking to presser foot: talcum powder! Just take any kind of talc: baby powder or any other kind and spread a thin thin THIN layer along your sewing line using your finger. It’ll be so thin, it will just form a film over the plastic/vinyl/oilcloth whatever you choose to use. Your presser foot will glide over the fabric perfectly normally. Wipe off the powder after. Hope this helps!
I will be trying this. The mat was so well done. And I love the design on you nails.
When I was looking for various fabrics, I noticed a lot of designers (including your bicycle print) have laminated versions of their cotton designs. They are meant for raincoats, etc. May save a step!
Good idea, Heather. They do tend to be a good bit more expensive though. Also, you could use iron-on vinyl.
Hi! Thanks for this tutorial! I was wondering where you got your fabric? I have seen it, also used with vinyl, on a booster chair that I am in love with. Thanks!
Hi, Jessica. I bought it at a small local fabric shop, but there’s a link to buy it online here: http://www.fatquartershop.com/store/stores_app/Browse_Item_Details.asp?sid=40628441040&Store_id=499&page_id=23&Item_ID=53401&Parent_Ids=
Super cute, Momma Cooper!
Oh MC, I LOVE this one! Such cute fabric choices, and I love the contrasting fabric on the pockets. Thanks so much for sharing, I love to see how crafters put their own spin on Marzipan projects!
I love your idea. I posted this idea on my blog. I love the helpful tip of the video. If you like to see my design please go to: http://meandmisszippy.blogspot.com/
Thanks for all your craftiness!!!!
This is gorgeous!!
So cute, Teagan! Thanks for sharing!
Oh my, this is the cutest thing I’ve ever seen! Thank you so much! I will be bookmarking this and saving it for when I get closer to my due date! Perfect for us mummies on the go!
I have never sewn before and I used this tutorial and I am so happy with the product! Thank you!
Great! I’d love to see a picture! You can upload one right here in the comments section.
You can also laminate your own fabric with Iron-On Vinyl. I think Heat ‘n’ Bond makes it. I don’t know if it makes it easier to sew with, but I imagine it would because there would be no pinning or slipping as it is completely adhered to your fabric.
Thanks for the tut! I will be making it in the next few months as I prepare for foster kids! I might also adapt it for cloth diapers and wipes. We’ll see. :-)
Yes, I made the one in the pictures at bottom using iron-on vinyl. I thought it was easier :)
Hi! Love the mat and was easy to make! But one problem I have is when I open it up to let the pockets of wipes and diapers hang off the edge it pulls the whole mat off of the table before I can put the baby on it. Any suggestions? Thanks!
I was thinking the same thing. I think I’ll try putting a “bumper” on the other side… like a tube filled with batting or fabric… something to counterbalance the weight hanging off the table. Anyone else have any suggestions?
I made this up in about 30 minutes but I cut and sewed pockets to make a second changing mat. Sadly I ran out of vinyl. I know I ended up with a lot of excess. Since I am making this as a gift, don’t have a baby, changing mat or any diapers/whipes to stuff it with I kinda had to wing it. Could you give me an idea of what the finished dimensions should be? I want to be sure mine isn’t actually doll sized or something. :D
Hi! Thanks for the tutorial. I was wondering if I could use iron-on vinyl for this instead of regular vinyl? I can’t think of why it would cause an issue, but wanted to double check. Thanks!!
Yes, you can, I’ve done it both ways and I think the iron-on vinyl is easier because there’s no risk of wrinkling it.
Your tutorial was very easy to follow and the iron on vinyl worked like a gem :) The attached picture is the second one I’ve made!
Thank you so much for sharing. I sewed it a few days back and it really turned out nicely <3
If you want to take a look : http://livinginaka.wordpress.com/
Hi, just wanted to say thanks for the idea and excellent instructions! I made mine in PVC (wipeable tablecloth) which, though making the final seam trickier, means it is waterproof and wipeable all over. Good if the mat has to lie on something outside during a picnic, if it gets rained on while in the pram basket or similar :-)
Have you a news letters please ? thank
Hello,
I am new in sewing, so I am not sure what needle, thread or thread tension should be used when sewing the vinyl. Anyone?
Thanks
Sze
Thank you very much for the tutorial! It’s really a good project, and I can customized the size of the changing mat the way I wanted it to be, the changing mat which comes with diaper bags are way too tiny for my growing baby. I did both sides vinyl, as I like it cleanable and will not get dirty or soiled. Size of my mat is 14″ x 24″.
This is a really cool thing you have going. I was just wondering if you would make and sell them for people who didn’t have machines to sew. And what would your price be?
Sorry Kierston, I have too many craft projects and too little time! I don’t currently sew items for retail sale :)
Can I just say that your blog is awesome!!!! Great tutorials! And a huge plus for videos!!! Thanks for all your inspiration!
I just finished my mat. I love you instructions!! I thought the mat was a tad small so I did alter the size slightly. Thank you for this video!!!!
Matching nails to! :)
Easy to make, but made the mistake of NOT making it wider than the suggested 12″. If I made another one, I would make it 16″ or 18″. Great pattern though!
I made one of these yesterday – thought it was a tad small though perfect for a new baby…. I have made another one today – really great idea and I am sure it will work well…
Luv it very handy
Thank you so much for your tutorials! They’re so easy to follow! ^_^
very cool
the recipient of the mat I made just loves it…. excellent idea – thanks so much.
This was very nice I’m going to make one for my friend she just had a baby
BEAUTIFUL tutorial! Very easy to follow. Thanks so much! :)
think i might try and make one for my baby
i used a heavier gauge colored vinyl and changed out my needle to a “16 denim”. I used iron on fusible batting (not on the vinyl side) and used an antique button. I used the vinyl instead of bias tape on the pocket trim. Take care when attaching the elastic that the larger part of the loop is going to turn out to the outside when complete. Once you stitch closed, it’s very difficult to move. Love the pattern. I enlarged it the second time to 13 wide and elongated the large piece on the pocket by 1 inch.
i also used a heavier vinyl, 16″ needle, fusible batting, and made my second mat larger by an inch all around. I added a handle so that you can pull it out of the diaper bag easily. Used an antique button. It’s a piece of art! Great instructions and comments too! Best shower gift ever!
This mat is functional and compact. Can’t wait to make one for my newborn.
Where did you get the bicycle fabric? I love it. I have a cycling friend that is pregnant. I’d love to make this for her with that fabric.
Hi Laurie, you can buy it online from my sponsor site FatQuarterShop.com. It’s Michael Miller, here’s the link: http://www.fatquartershop.com/michael-miller-baby-gray-bicycles-yardage
Love this, hope I can get it to my printer from away from home.
I made two they turned out great are we allowed to sell them online
Hi Keturah, I’m so glad they turned out great! Thanks for asking about selling. Since I’ve had a lot of people interested in selling items made from my patterns, I’ve created a listing in my Etsy shop that gives you the rights to sell items made from a single Made By Marzipan tutorial. I appreciate the support from my followers that allows me to keep posting new projects! The listing is found here: https://www.etsy.com/listing/188944497/selling-rights-to-a-made-by-marzipan?
Found this pattern on Pinterest, and I have created it 3 times already, thank you so much for the easy instructions. Everyone loves it and I got my first request for one. This has also turned out to be a good stash buster. I will probably make up a couple more to have ready to go as it seems to be baby season around me. Thanks again.
I’m so glad it’s been useful to you!
Love Love Love this!!!! Just finished making on for my niece. Her them is Pink and Navy Nautical. I live on an Island and very far from the mainland. So I used a shower curtain from the Dollar Store for my vinyl and sewed it to a secondary piece of fabric for stability and it worked perfectly. I will post a picture shortly. I have another Niece/Nephew and a dear friend who will also be receiving one of these! Thanks so much for sharing.
That sounds way cute! Can’t wait to see!
Hi there, looking at the fabric etc needed, do I need 2 of each of the fabric lengths for the pockets and the main mat?
So cute! Can’t wait to make it :)
Just curious – where did you get your business labels? I’m thinking about buying some of my own!!
Hi!
Just wondering, could I throw this in the washing machine?
I used a different type of vinyl – just white with some print on it, instead of using another piece of fabric…
Thanks!
I love this! It will be my project for the weekend. I keep my Grandbaby daily while Mom and Dad Work. I change him on the bed and so I plan to put the mat under the mattress and let the pockets hang off the edge of the bed for easy access. Thanks sharing the pattern and the video was a great help.
Great tutorial! This looks super handy for moms, or dads ;) I love that if folds up into a stylish clutch and that it is easy to open and close with one hand. Thanks for this great tutorial, love the video too!
I linked to your post from my blog, click here to see it.
Loved the tutorial. Recently bought a bolt of PUL on sale from Tuesday morning. So I’ve been using the PUL instead of the vinyl.They have turned out so cute. I had contrasting colors to use on the pockets. Giving the changing mats to my daughter and one of her BFF’s, they are both due in December. Thanks again Sweetie.
Thanks for the feedback! They sound adorable!
i know this question has been asked, but what needle size is recommended? I used a 16 on seeing the “decorative stitch.” I had to rig my machine so the vinyl wouldn’t stick because it wasn’t feeding thru. Over all my mat is useable but my “decorative stitch” was an epic fail :)
Okay, just kidding, next time I’ll read all the comments before I ask my questions. Found my answers.
This design is steller! You certainly know how to keep a reader entertained. Between your wit and your videos, I was almost moved to start my own blog (well, almost…HaHa!) Wonderful job. I really enjoyed what you had to say, and more than that, how you presented it. Too cool!
Dear Marzi, do you know where i can buy one of these changing mats? Online? Cheers Barbara
I made this today and it worked really well. I too had trouble with the plastic at first but I just turned it over and sewed on the fabric side – easy!! Thanks for the tutorial.
I love this and would like to make one. Can you suggest alternatives to using vinyl given the increased awareness and interest in using less plastic?
Much appreciated.
I have made several of these and about to make another. They make great gifts and the receivers love them.