1
First we’ll cut the inner fabric pieces. This is what will show when your case is opened. All pieces will be cut to the same width: measure the Width of your device and add 1 inch. We’re going to cut three pieces.
- The first piece should be the Length of your device, + the Thickness of your device, + another 1/2 inch for seams.
- The second piece should measure the Length of your device, + a 1/2 inch for seams.
- The final piece should measure half the Length of your device, plus the Thickness of your device, + another 1/2 inch for seams.
For an iPod Touch or newer iPhone, cut the pieces to
- 3.25 W x 5.75 L
- 3.25 W x 5.25 L
- 3.25 W x 4.0 L
2
Now we’ll make the corner pockets. I’m cutting four 2-inch squares from my outer fabric. If your device is thicker, say a half-inch, you may want to cut these larger and make a little pleat when you sew them. Alternately, you could choose to substitute wide elastic here.
3
Fold the squares in half to create triangles and press. Pin one to each corner of the second piece you cut, lining up all the raw edges. Sew along the raw edges of the triangles with a 1/8 inch seam. Right now we’re basically just tacking these down, they’ll be sewn more securely later.
4
Now we’ll sew together our inner fabric pieces. Place one piece on top of your pocket piece, right sides together. Sew along the short edge with a 1/4 inch seam. Then, lay the last inner piece on the other end of the pocket piece, right sides together, and sew with a 1/4 inch seam. So now your pocket piece should be in the middle. Press the seams open.
5
Next we’ll make our tab closure. Cut a 2.5 inch square of each pattern of fabric. Sew together with a 1/4 inch seam, leaving the bottom edge open for turning. I chose to round off my corners. Turn the tab right side out and press.
6
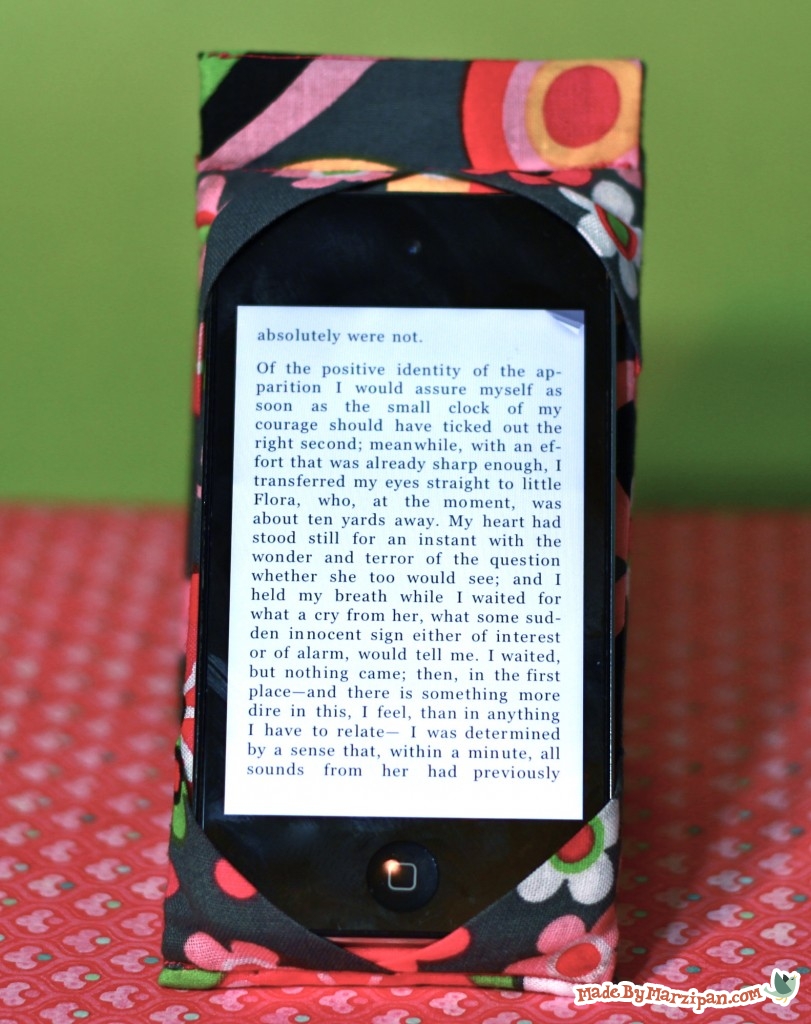
Now we can cut the rectangle of outer fabric. You can skip a lot of calculations if you just lay the sewn inner piece of fabric on top, and cut your outer fabric to the same size.
7
With the sewn inner fabric face up, place the tab along the center edge of the shortest rectangle. It should be pointing inward. Make sure that like patterns are touching.
8
Then lay the outer fabric face down on top of the the inner fabric and pin in place. Sew along the three edges with a 1/4 inch seam, leaving the short end without the tab open.
9
Trim the edge of the tab if necessary. Turn right side out and poke out the corners with a blunt tool. Press well.
10
Now we’ll cut the inserts. This gives the case the stability to stand on its own. You can use chipboard or thick cardboard. Trim the chipboard to slightly smaller than your sewn case. You want it to slide in easily, but still be snug.
11
We’re going to cut the chipboard into five pieces. Two pieces will create bindings. Each binding insert should be equal to the Thickness of your device. The other three pieces will go inside each rectangle section. You’ll need to leave a little space between each insert to sew a seam.
12
Before inserting, we’ll add some batting to protect the device. Use fabric adhesive spray to add thin batting to each side of the three inserts. (You don’t need to add it to the binding inserts.) It’s a good idea to protect your work area with wrapping paper.
13
Slide the short insert into the case and work it down to the bottom. If necessary, insert your scissors and smooth down the batting. Topstitch a seam right next to the insert.
14
Next add a binding piece. Slide it down to the seam, then topstitch next to the insert to hold it in place. The seam should be nearly on top of the seam that holds your inner rectangles together.
15
Add the center piece, and topstitch close to the original seam. Add a binding piece, and topstitch right next to it. Finally, add the last insert.
16
Fold the raw edges inward. You could topstitch this shut, but it will look much tidier if you sew the opening by hand with a blind stitch. If it’s done properly, you shouldn’t see your stitches at all.
17
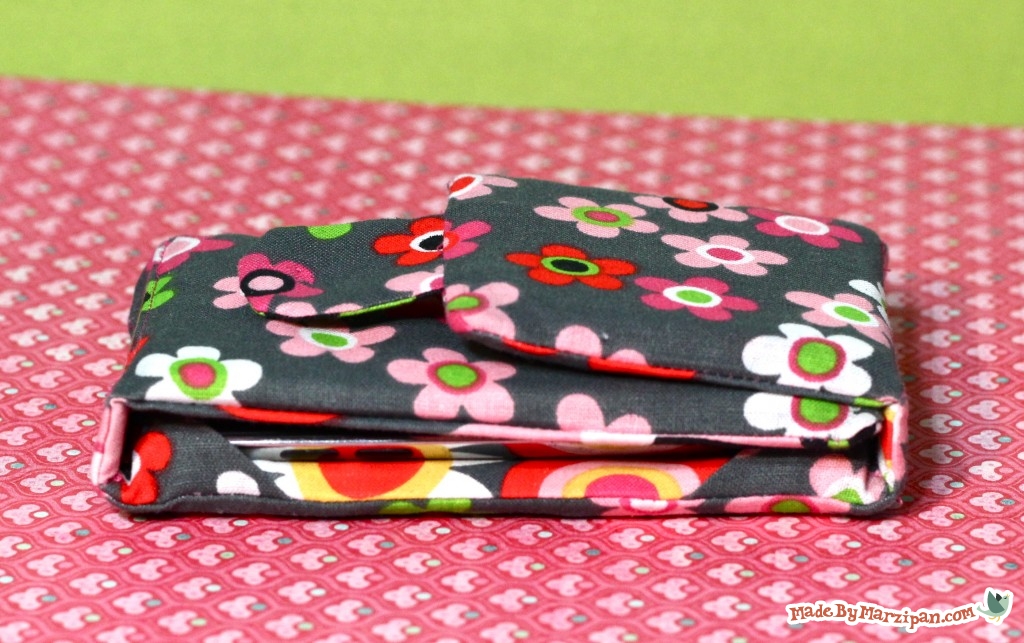
Now we just need to add the snaps. Hand sew the protruding half of the snap to the inside of the tab. Close the case and note where the snap touches, and sew its mate there.
18
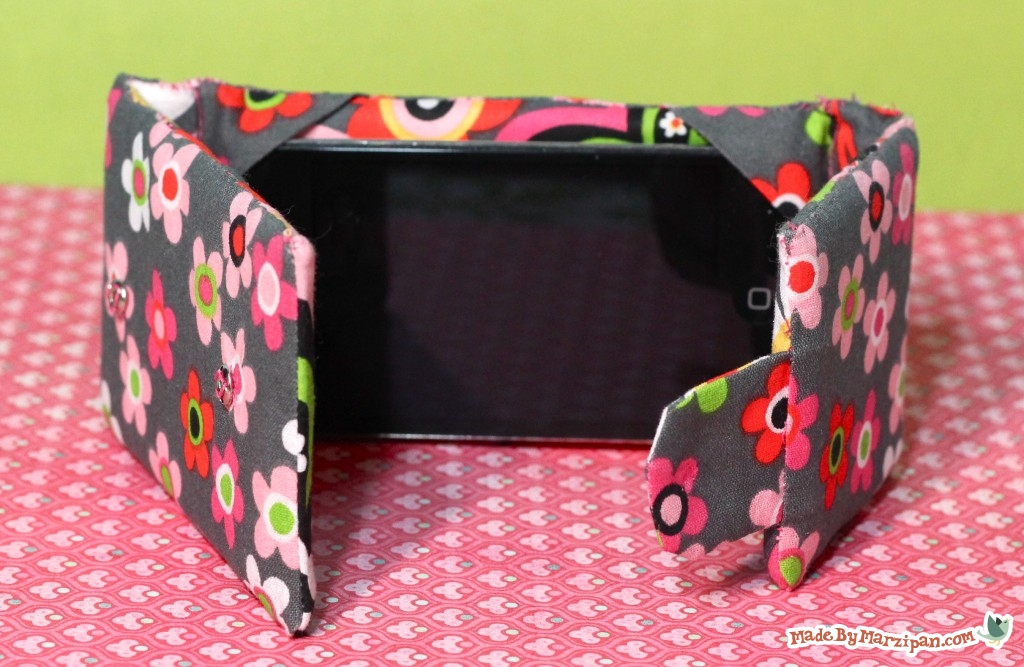
Open the case and stand it upright. The short piece with the tab should be on bottom. The tab should be on the inside of the case. Note where it touches the back, and sew a mate there as well.


 Finished?
I cannot wait to make one of these for my ipad!! Thanks so much for sharing!
This excellent tutorial will be featured at PatternPile.com – keep up the excellent work!
Awesome design! I really need to make this for my iPhone. Thank you for sharing with us!
Great design & tutorial. I’m going to adapt it for my Kindle Fire.
omg, this is perfect!!! I’ve been wanting to make something like this forever! I love reading on my ipod while eating lunch.. :) Thank you sooo much!!! :) :)
Kate, it looks fantastic! I always get so excited to see what my crafting friends come up with. Thanks for sharing!
I’m glad you shared this pattern. I’m on my way to try it out for my Incredible phone. Then DD’s ipad
so cute! what an awesome patteren!
What generation ipod touch??
Sam, this is for the 4g. You can adapt it for any e-gadget, although you may want to switch out the corner pockets for elastic if your device is thicker. (See my In-the-Loop iCozy for an example.)
This is so practical! Thank you for such a detailed tutorial! We would LOVE for you to stop in and link it up to our Saturday Showcase- http://bowdabrablog.com/2012/05/12/saturday-showcase-craft-projects/
This is awesome! Thanks for sharing this pattern freely. I can’t wait to make one for my iPhone 4s.
This is SO cool! I am so making this for my iPod touch!
Thank you for sharing this tutorial and pattern! Terrific design!
Thank you for sharing this video.. What a great idea.
i love this web site
Hi! I just find this great pattern, it’s exactly what I needed! Do you know if it would work with leather? Would it be too stiff?
What was the measurement of the last chipboard piece? Could not see it in the video. 2.5 x 4?
Melissa, it’s 3.25 x 4 (there’s a measurement list in the written instructions).
i am doing this tomorrow, I can use left over fabric and don’t need to spend any money
I did this the other day and didnt have a sewing machine so i hand stitched everything. Took me about 9 hrs. Ive been receiving compliments left and right. This a GREAT beginners project. Im going to make another one for my sister. This time with a sewing machine.
I also found that batting isnt that necessary and i prefer mine sans batting to keep my itouch relatively slim.
Thanks for the tutorial. You have saved my face from future accidents :-)
Wow, hand sewn, that’s impressive! You’re right, batting isn’t required, although it does add a little extra protection against dropping your device (I have kids, so I like to be prepared!) I’d love to see a picture, you can show off your project right here in the comments section :)
I absolutely love this pattern, thank you so much for posting! My question is, and this is because I’m much more of a knitter than a sew-er, but if I want to size this up for my Kindle, do I need to buy more than a 1/4 yard of fabric, or is that enough? Thanks so much, can’t wait to try it out!
I don’t know the measurements of a Kindle, but a 1/4 yard of fabric is 9 inches wide. Minus the seam allowances, you have 8 inches to work with. Since you need a front piece and a back piece, yes you’ll need more fabric. I would measure the width of the device, double that, and add 4 inches to be safe. Happy sewing!
This is soo cool!!
Thank you marzipan!!:)
great tutorial easy to understand thanks for sharing.Lee (NZ)
Thank you so much! I have fabric and time but not a lit of Christmas spending money, so your idea will really help me make an affordable and special gift for my iPhone-owning friends and family!
Thank you for sharing. : )
I don’t see a contact page on your site, but I’m going to be linking to this tutorial for a “Best Homemade Gift Ideas on the Net” post on my blog (www.ProverbsThirtyOneWoman.blogspot.com). I’d love to use one of your images of the finished project. Of course, I’ll include credit to your site, as well as a link to this tutorial. Could you let me know if this is okay with you? Thanks!
SO cute!! I want to make one as soon as I go home for Christmas break and return to my sewing machine <3 Thanks for the tutorial!
Im making one for my sister, thank you so much for a great idea!!
I love these!! I am making them for Christmas.
Would I be able to link back to your site if I were to write up a tutorial on making a case for a Kindle on my own website? I would be using all my own photographs and instructions, but I would like to include your page as the origin of the instructions. I will, of course, give all credit to Made By Marzipan and mention the Authorised Sellers you have listed, as a way of extending your audience.
Thanks for taking the time to read this, I will send pictures of my own Kindle case when it is finished,
Laura
Hi Laura,
You’re welcome to post pictures of the item you make and include a link, but I ask that you not post an actual tutorial for this item on your site. Thanks for asking first!
It said there was a video?
I Really love your website! I already made this one and I am going to make it again for my sister. It’s really beautiful so thanks for the pattern!
Hello Marzipan.
I will do this in leather. Also, I would like to comment on your delivery in your tutorial. Totally Awesome. One of the best I have heard thus far.
Thanks for sharing.
Thank you for sharing this fantastic tutorial!
Just wanted to let you know I love the ipod/iphone case stand. Already getting requests for them. I am posting a picture for you to see.
Thank you,
Jim Adkins
Aspired Sewing & Embroidery
Easy and just what I wanted!!!
super , je vais le faire cet apres midi , même plusieur pour offrir , merci pour le tuto !!
This is my creation! :D
A case for my samsung galaxy ace ;)
Kisses from Holland!
Hi,
I just tried this tutorial for the first time and got stumped when it came to sewing on the snaps. The first one on the tab was fine but when it came to the second I’m not sure how to do it. i cant sew my needle through the chipboard to the other side. Am I using the wrong sort of snap I could really do with some help please. :( it didn’t have a clear description of sewing them on, just kind of skipped it.
Hi Kate! No, you don’t sew through the chipboard to the other side. Instead, go into the fabric sideways with your needle, so you only pick up the top layer of fabric. Be sure you’re using sew-on snaps and not the kind you hammer in :)
Hi Kate. This really caught my eye! Our guild is looking for things to make for a Boutique Sale locally to bolster our (shrinking) funds. Would you give us permission to make a few of these? I’m going to make one for my college kid, anyway. Thanks.
Hi Elizabeth! You’re welcome to make these for personal use. If you make them for retail sale, I do ask you pay a one-time fee of $4.50. You can purchase seller rights by visiting this link to my Etsy shop: https://www.etsy.com/listing/89629674/ipod-touch-iphone-case-stand-pattern-to?ref=shop_home_feat Thanks for your interest!
Do you think Timtex (or something similar would work instead of chip board?
Hi… I’ve never heard of “Timtex.” Stiff (not corrugated) cardboard or plastic would work :)
It looks so great :-)
I really enjoy watching all your fantastic craft ideas every week, I look forward to making many of them :)
Thanks so much for doing the crafts like this one it is so cool to know how
to do these things when I’m in a crafty mood!
Thank you for sharing this gold tip!! I’ve looked for the way of making my own pod case.(In Korea, there are few cases here..) So.. Finally I made it!! by my hands, without sewing machine..(It was so hard.. :( )
Anyway.. It is so nice and convenient. But only thing I feel sorry is I can’t listen to musics with this case. (It covered the ear phone whole.. oh my!!)
I made it for my e-reader Kobo!
whit your help it’s look amaising!
thank you!
Just finished making one for my tablet. It only took me a little over an hour. Fabulous instructions and the video is great! Thanks so much for sharing this idea!
wow!!!!!!!!!!!!!
Do you have a tutorial for the samsung galaxy 3?
Thank you for sharing this to other people
Thank you so much for this pattern. My son has Lou Gehrigs (ALS) & can no longer hold his phone & we try to communicate every day & this has been a miracle for him. My daughter-in-law sets it up for him & she doesn’t have to stand there & hold it.Do you have any other patterns for something for people that no longer have use of their arms? Thank you again & God Bless
I’m so glad it was helpful! If your son uses a wheelchair, I’ve heard from people who have used my Stroller Bag tutorial to make an easy-access wheelchair bag that hangs on the handles :)
Thanks for the tutorial! I made one yesterday for my iphone 6. Here are the measurements for anyone who wants to do the same. It took me three tries to figure it out just right, but math isn’t really my thing. Hopefully this will save someone time. Length: First piece: 6 1/4″ x 3 5/8″; Second piece: 6″ x 3 5/8″; and third piece is 3 1/2″ x 3 5/8″. Width: 3 5/8″.
Thank you so much! Very helpful!
Hi, how to measure the fabric for 7″ tablet? I really have no idea (im a very very beginner sewer, but very interested in learning new thing). The measurement for my tablet is 19.37cm W x 12.24cm L x 1.05cm thick.
How should i measure the fabric? Thank you very much for your help before, really appreciate it :D
Hi love this pattern. I am getting a new phone a Samsung Galaxy 5 is the I phone about the same size.
Instead of cardboard cut pieces from laundry detergent bottles..then it is washable.